Nuxt Fundamentals
Workshop

👋
Welcome!

My name is
Daniel Kelly
- Lead Instructor at Bitter Brains
- Full Stack Developer (10+ Years)
- Husband and Father of 3
Daniel Kelly
- Lead Instructor at Bitter Brains
- Full Stack Developer (10+ Years)
- Husband and Father of 3
Hello


- Full Time Instructor @VueSchool
- Masterclass Lead Instructor
- Full Stack developer
M
ostafa

1614+ Video Lessons
200,000 users


Alex Kyriakidis
Daniel Kelly
Debbie O'Brien
Chris Fritz
Maria Lamardo
Roman Kuba
Sébastien Chopin
Filip Rakowski
Mostafa Said


Rolf Haug
Workshop Structure
Learn Nuxt in 6 Sections
- Intro to Nuxt
- Nuxt Rendering Modes
- Pages, Components, and Layouts
- Data Fetching
- Error Handling
- SEO and Meta
Each section
👨🏼🏫 presentation
👩💻👨🏽💻 exercise
💬 Q&A
📺 solution
👨🏼🏫
Presentation will look much like what we're doing now
💬
Questions are taken from the general chat.
(you can IGNORE the Q&A tab)
👩💻👨🏽💻
Exercises are your time to practice what you've learned
👩💻👨🏽💻 Exercises
- on your own machine
- work in teams
- exercises are independent
- ±20 minutes
(show structure in repo)
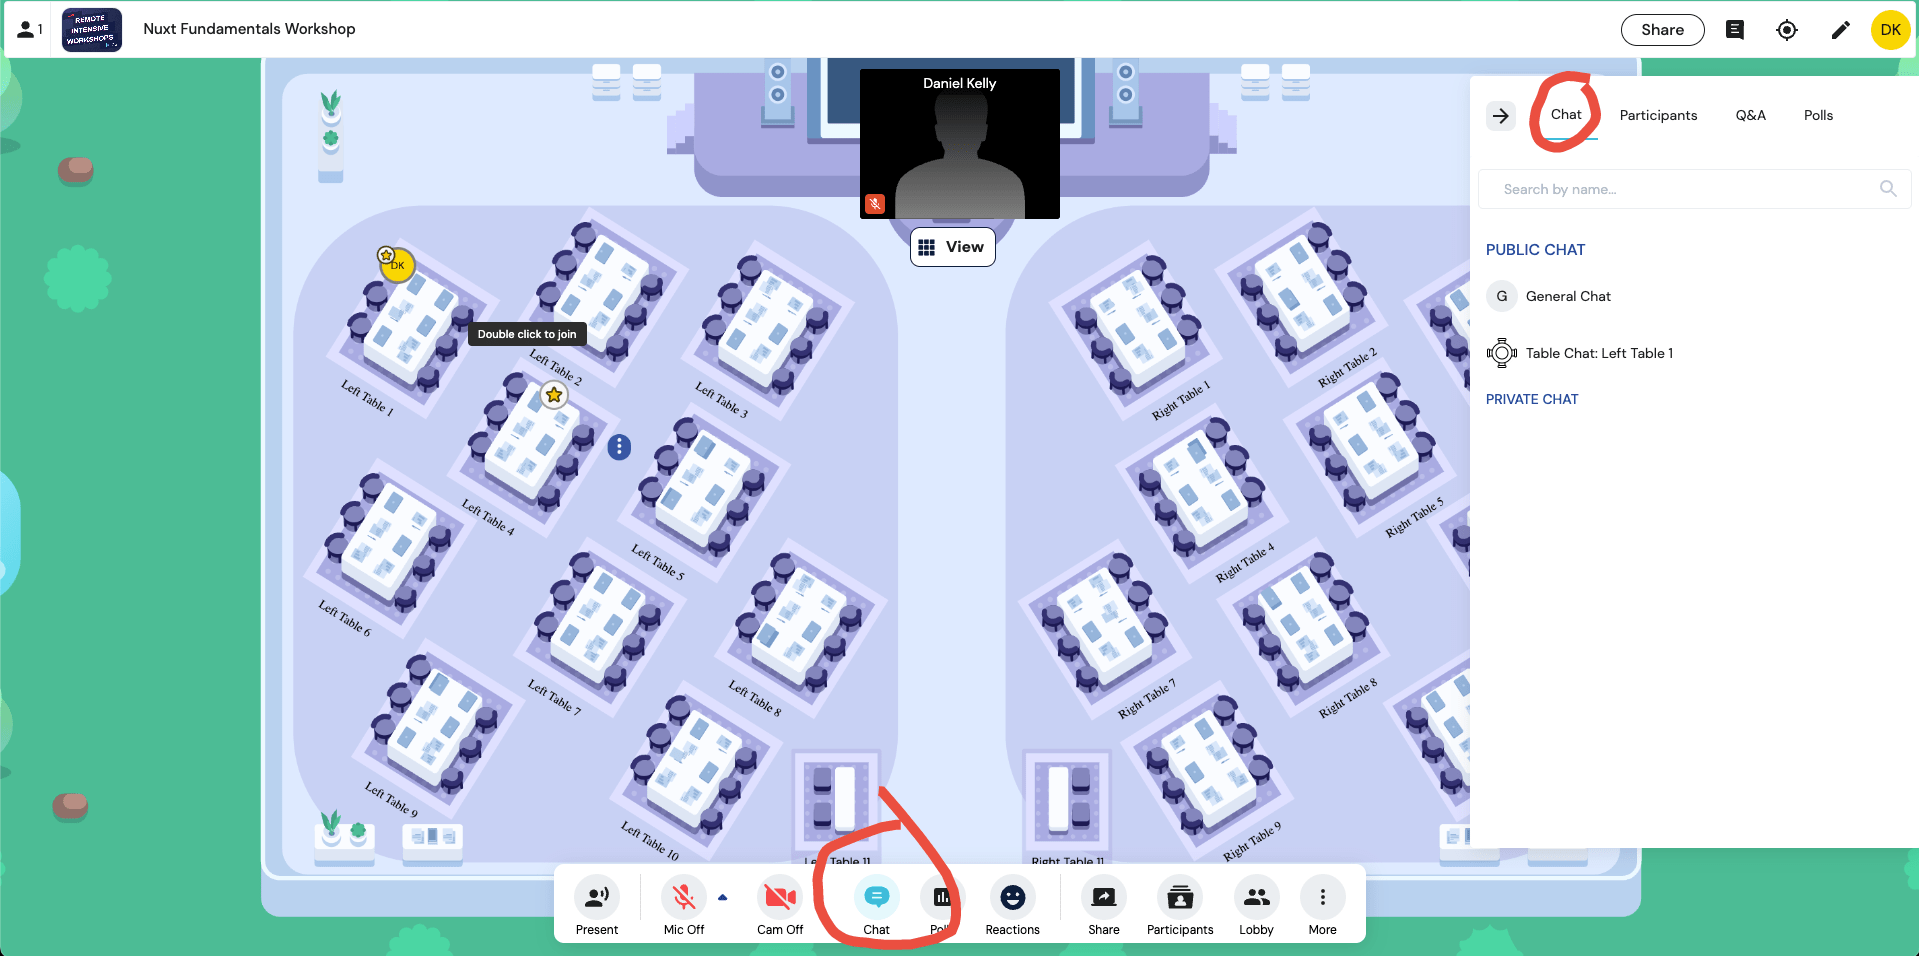
Pick a table and meet each other!
⏰ 5 mins
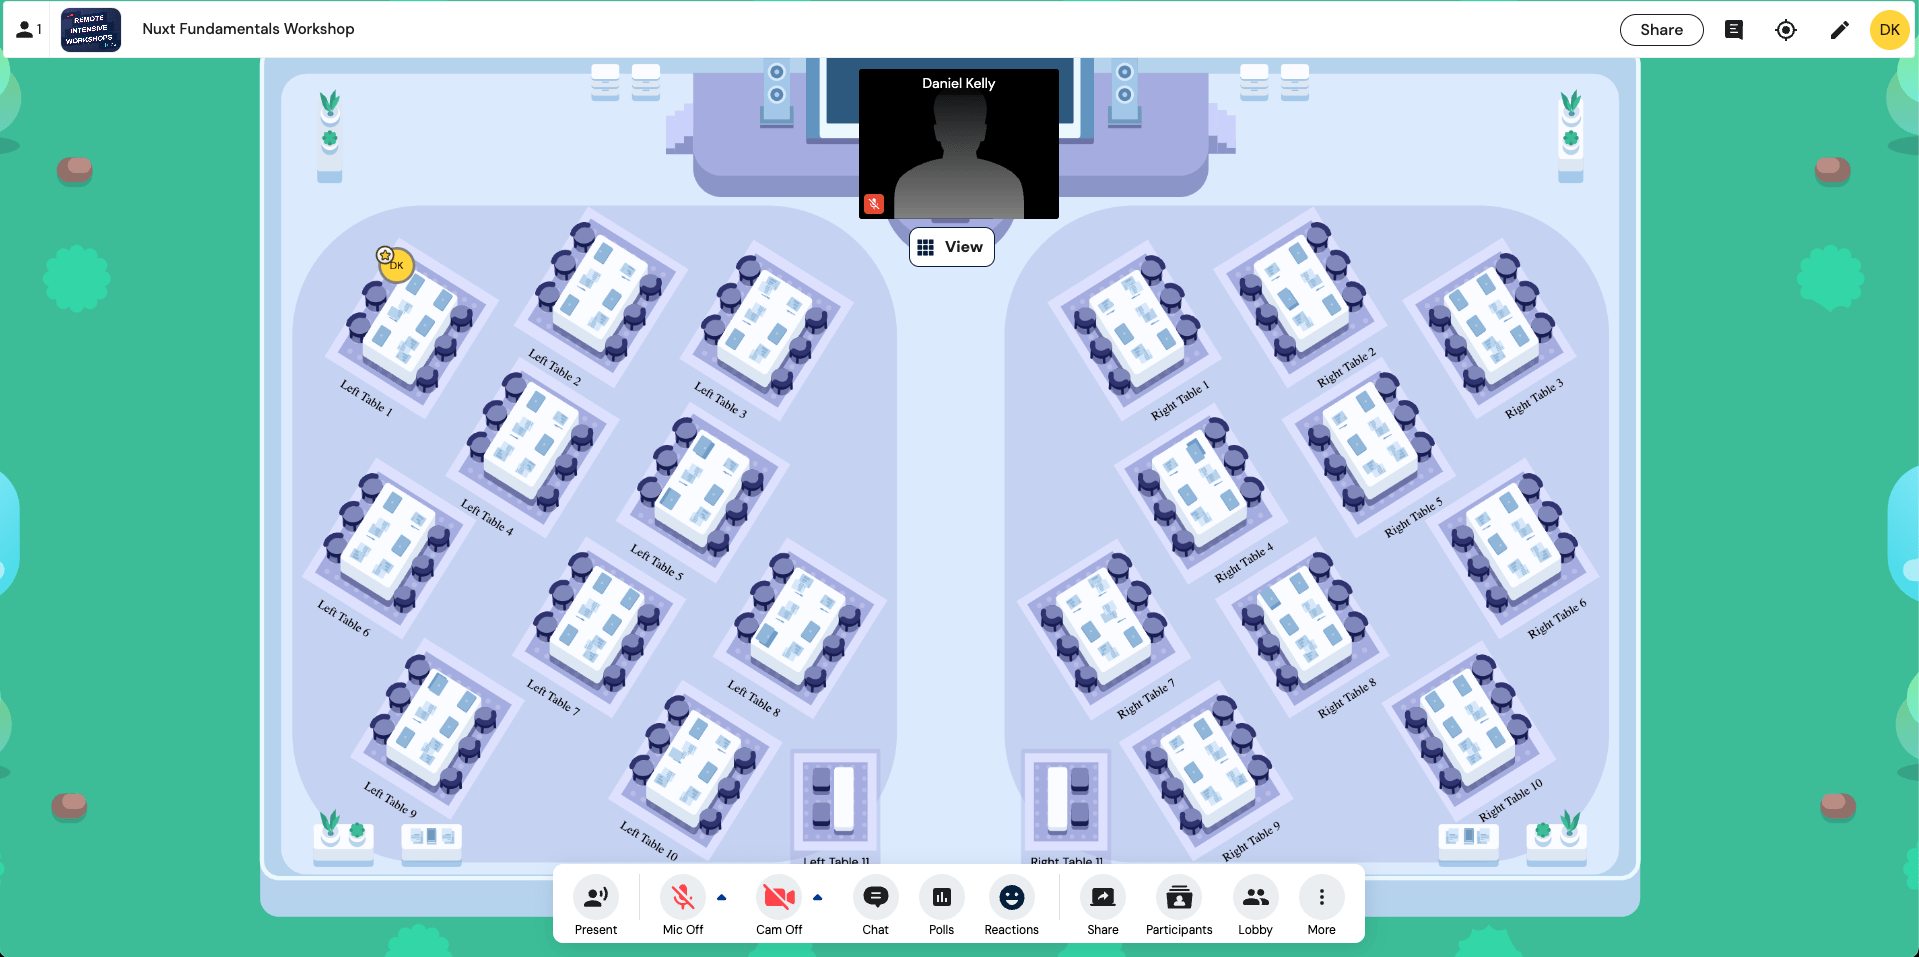
👩💻👨🏽💻 everybody join a table?
Topics
- Intro to Nuxt
- Nuxt Rendering Modes
- Pages, Components and Layouts
- Data Fetching
- Error Handling
- SEO and Meta
- Configuring Nuxt Projects
- Asset Handling
- Deployment
Bonus Sections
without exercises
(may or may not get to)

Get ready
We've got a lot to cover
Intro to Nuxt and
Getting Started
1
Section
What is Nuxt?

What is Nuxt?
Built on the top of Vue.js 3
Build Interactive UI Elements
Interactive Forms
Cookie Consent Dialogs
Carousels
Every repetitive task is automated
You won't have to worry about:
- Imports
- Routing
- Data Fetching
- State Management
- Error Pages
- TypeScript
- Server-Side Rendering (SSR)
- Search Engine Optimization (SEO)
- And more...
Who Uses Nuxt?


How to Get Started?
How to Get Started?
Knowing Vue is an absolute must for working with Nuxt.
How to Get Started?
Knowing Vue is an absolute must for working with Nuxt.
It powers all the view layers and shares concepts such as reactivity, composables, and more with Nuxt.
What do you need to get started with Nuxt?
What do you need to get started with Nuxt?
- Node.js -
v22.xor newer - Text editor - Visual Studio Code with the official Vue extension is recommended
- Terminal
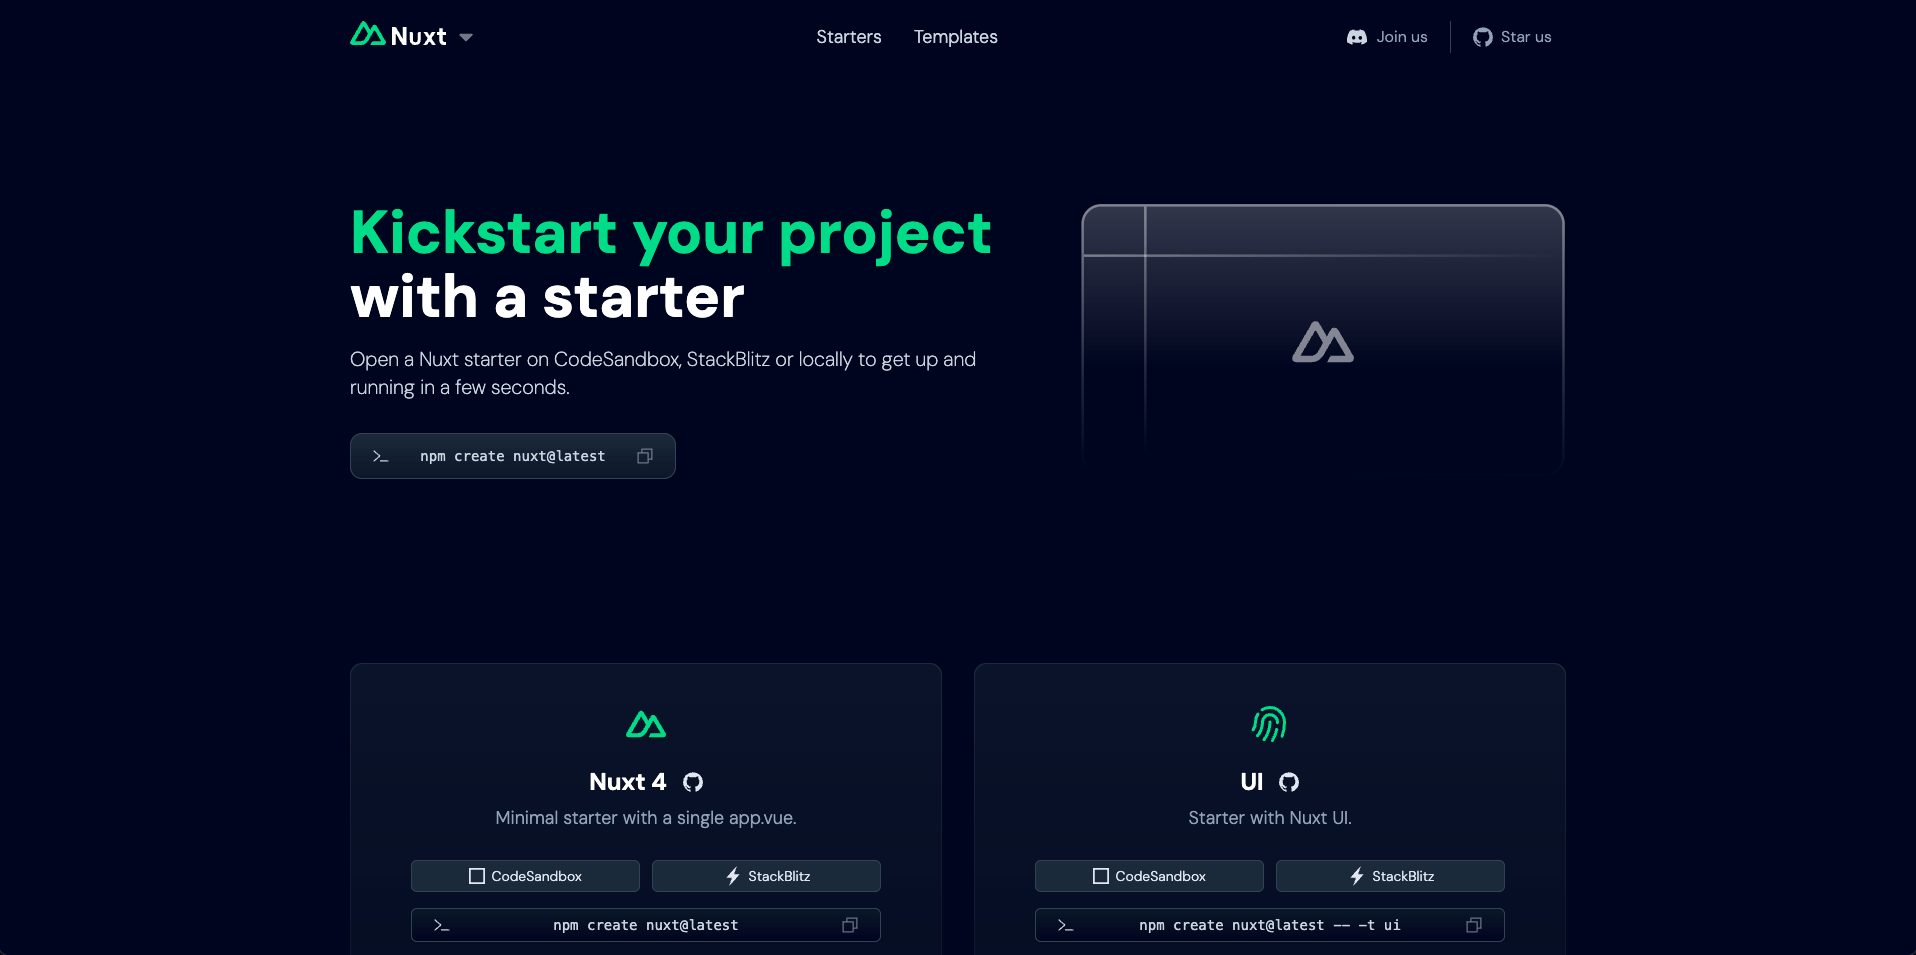
nuxt.new
(visit nuxt.new and showcase each method)
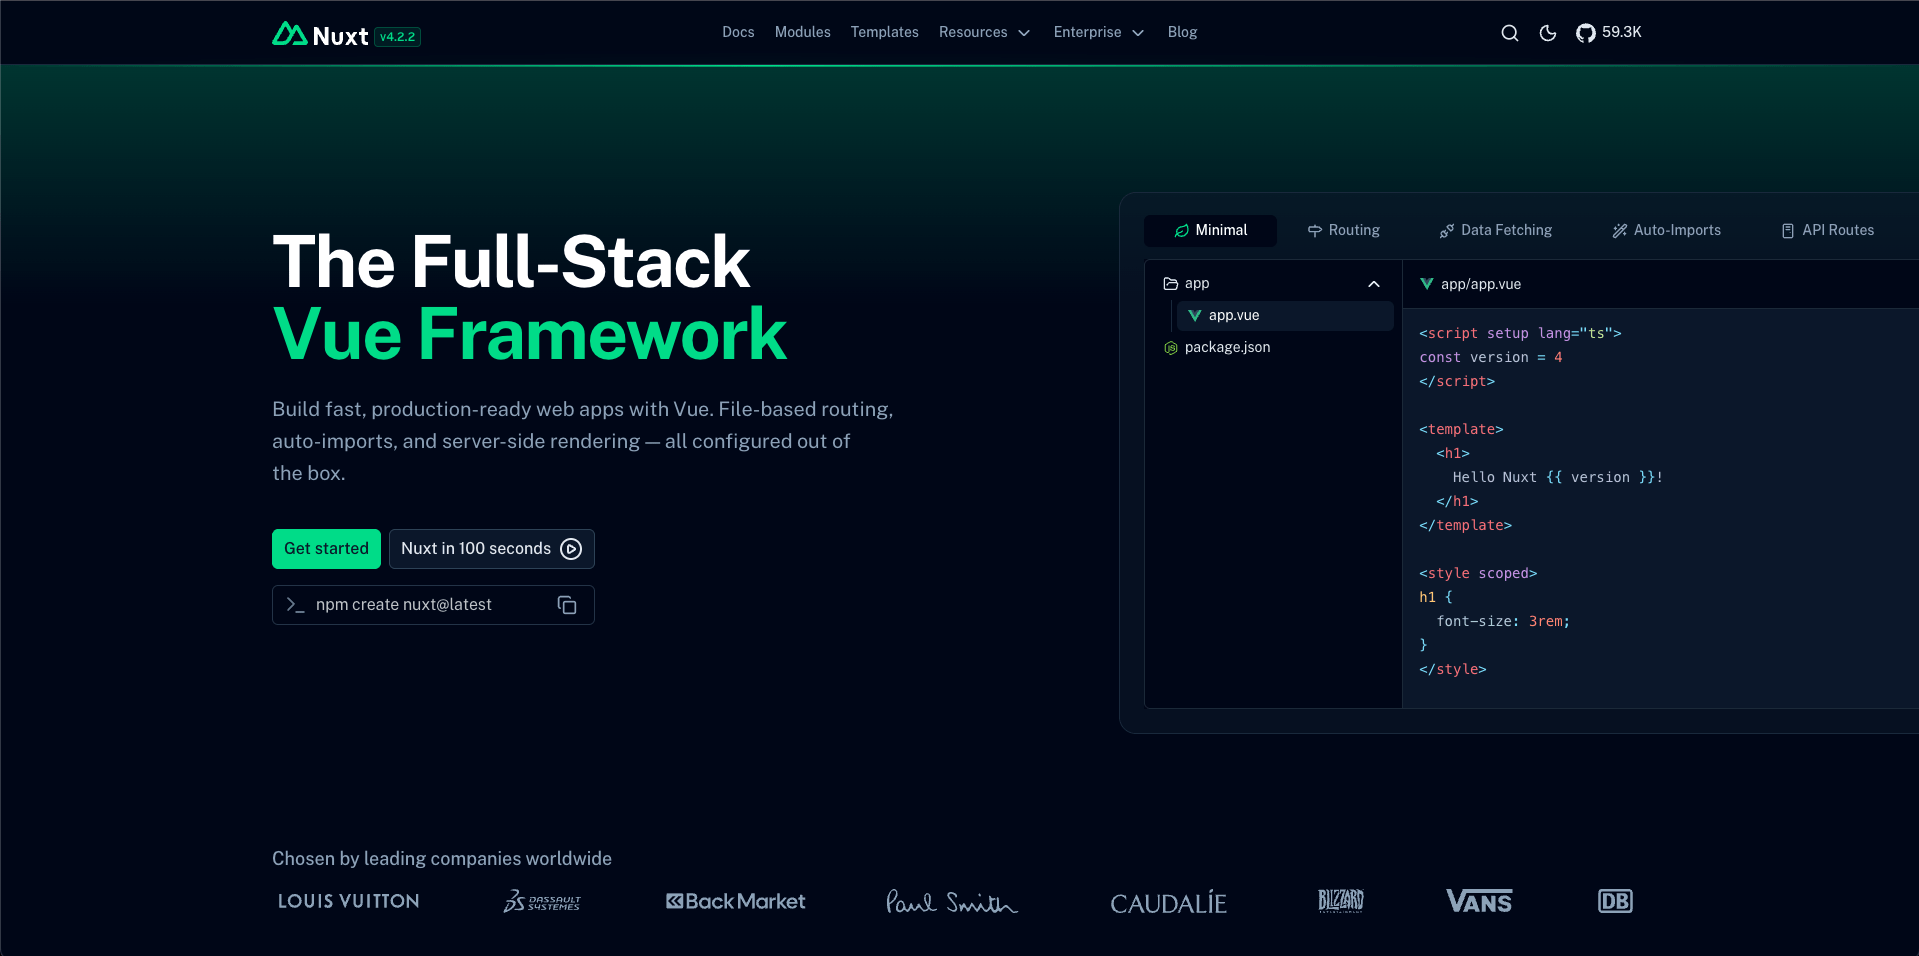
npx nuxi@latest init <project-name>Creating a new Nuxt app is as simple as running the following command:
Need to install the following packages:
nuxi@3.13.1
Ok to proceed? (y)
You will be asked to install Nuxt CLI (Nuxi)
Need to install the following packages:
nuxi@3.13.1
Ok to proceed? (y)
You will be asked to install Nuxt CLI (Nuxi)
This is needed to run nuxt commands
❯ Which package manager would you like to use?
● npm
○ pnpm
○ yarn
○ bun
Select you preferred package manager
Open the project in VS Code
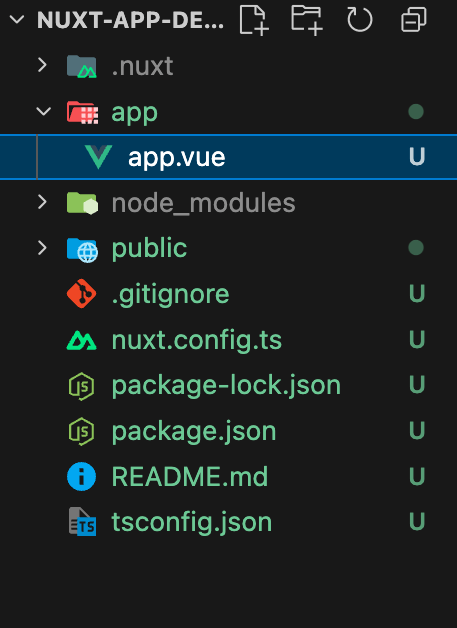
Nuxt uses an opinionated directory structure to automate repetitive tasks and allow developers to focus on pushing features.
Nuxt uses an opinionated directory structure to automate repetitive tasks and allow developers to focus on pushing features.
We will talk about the directory structure in details as we go through the material.
Start a new dev server by running:
pnpm dev
// Or
npm run dev
This will run a script that triggers the Nuxt CLI to start a Vite development server.
// package.json
{
"name": "nuxt-app",
"private": true,
"type": "module",
"scripts": {
"dev": "nuxt dev",
// ..
},
"dependencies": {
// ..
}
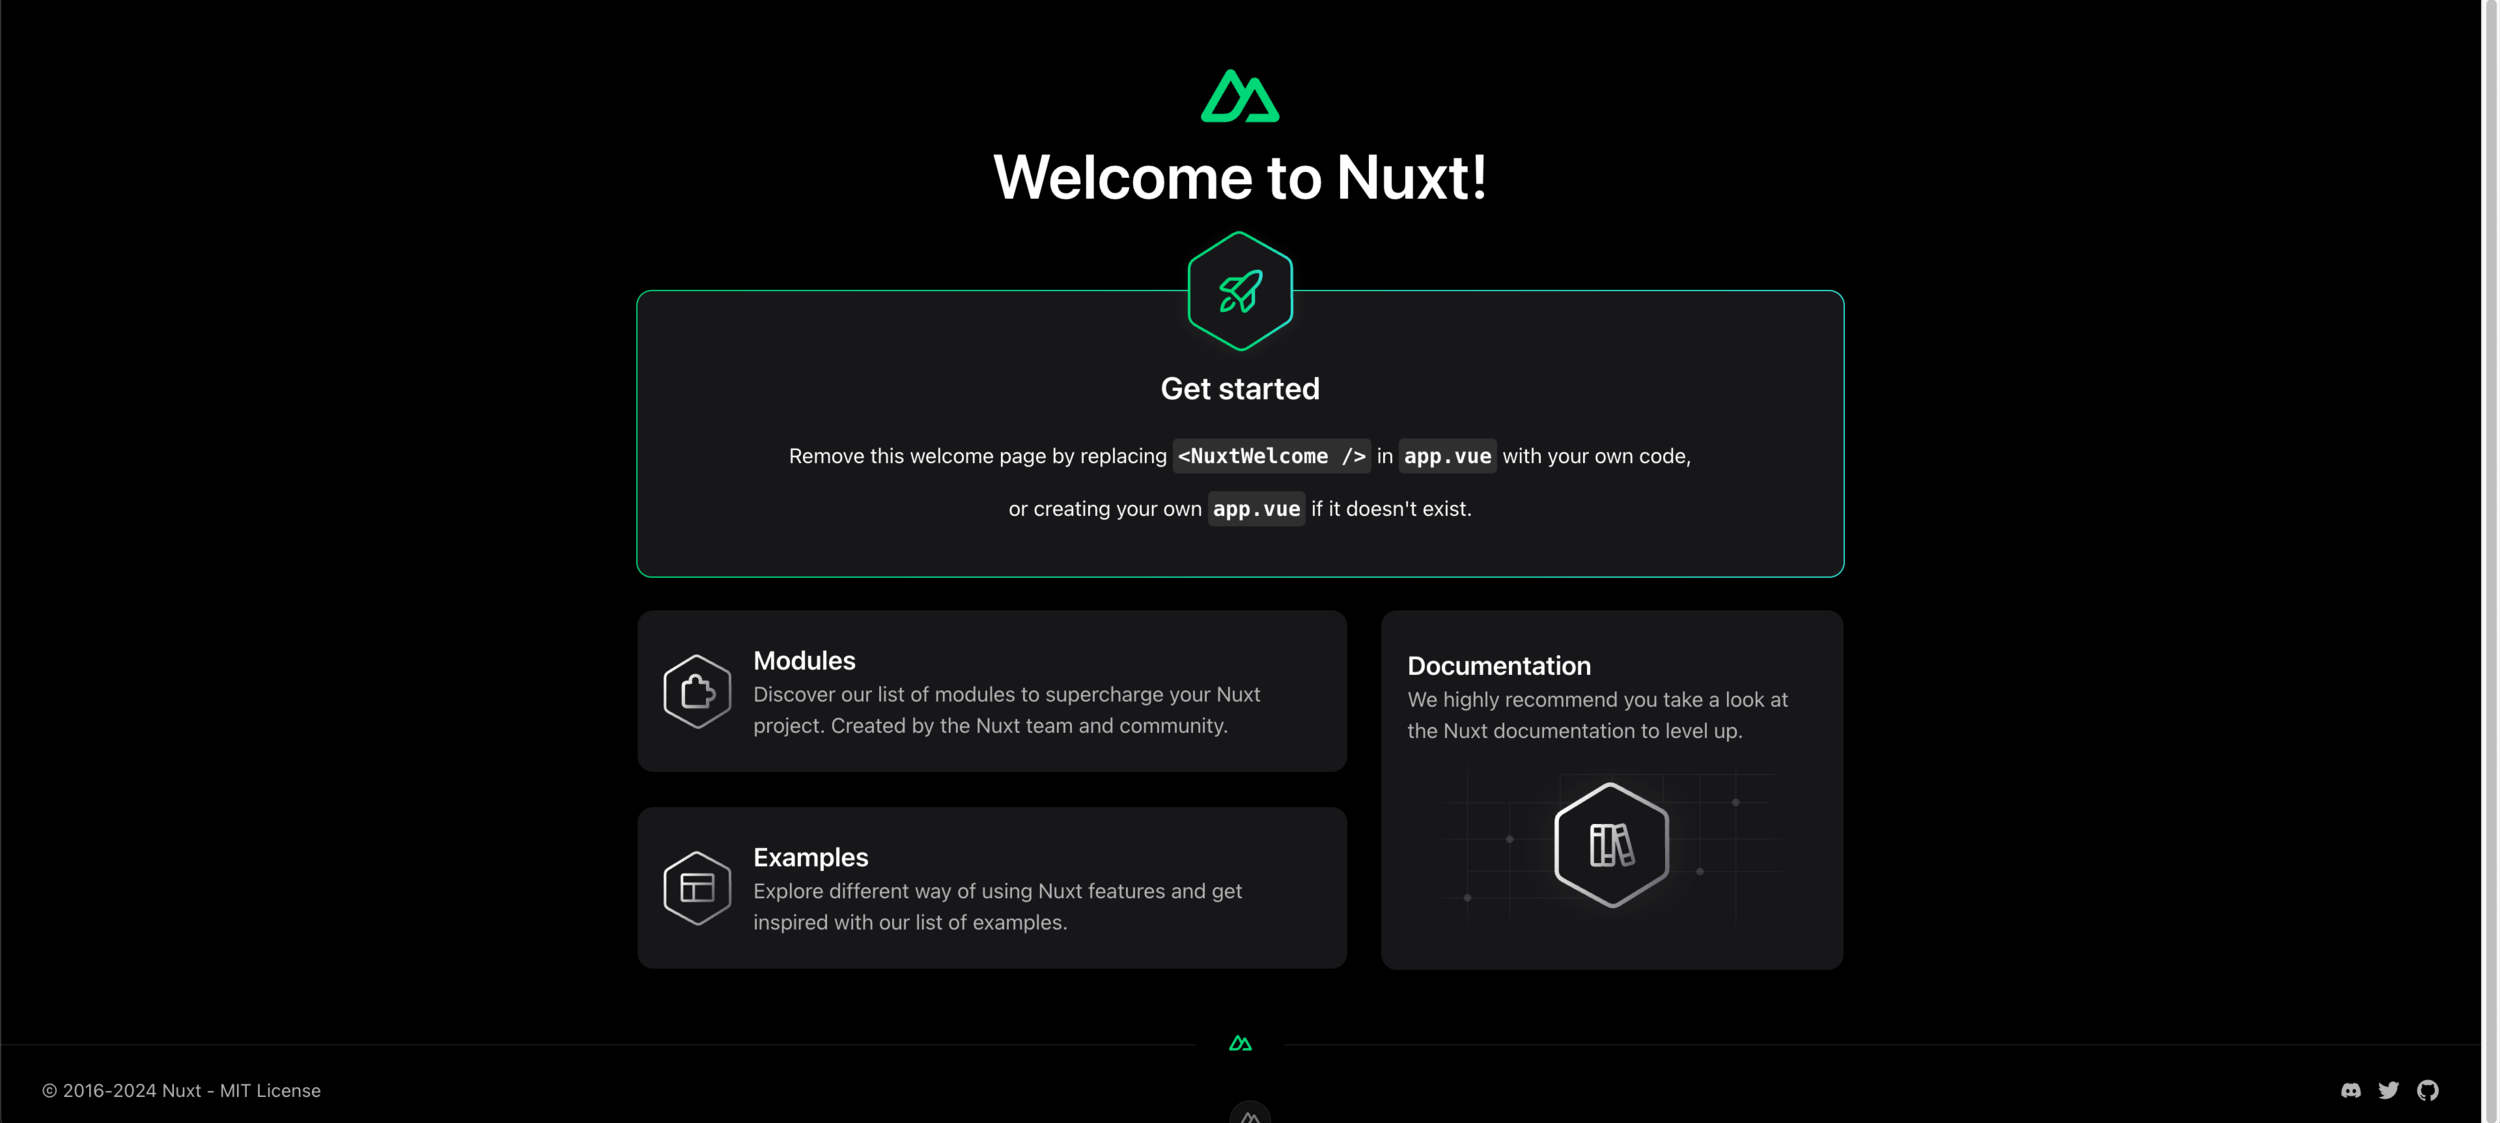
}The browser will open
and the Nuxt welcome page will render 🎉

The browser will open
and the Nuxt welcome page will render 🎉
The App.vue component is the Vue instance's root component.
Questions?
🙋🏾♀️
👩💻👨🏽💻
Exercise 1
Did you setup the project locally?
Nuxt Rendering Modes
2
Section
What is Rendering in Web Dev❓
Before we start with Nuxt rendering modes..
It is the process of converting code into viewable, interactive web content
What is Rendering in Web Dev❓
Both the browser and server are capable of
running the JS files needed to render Vue components
What is Rendering in Web Dev❓


What is Rendering in Web Dev❓
Converting .vue SFCs
to HTML elements
Both the browser and server are capable of
running the JS files needed to render Vue components
So, a server-side rendered app is one
that renders HTML content on the server
Server-Side Rendering
Server-Side Rendering


https://vueschool.io
Server-Side Rendering
Request
https://vueschool.io
Server
Server-Side Rendering
Server
Request
https://vueschool.io
HTML
Render
Server-Side Rendering
Request
https://vueschool.io
The HTML files contains the actual HTML elements
of the page
<!DOCTYPE html>
<html>
  <head> .. </head>

  <body>
  	<main> Actual content .. </main>
  </body>
</html>
🔎
HTML
Server
Render
Server-Side Rendering
Request
https://vueschool.io
HTML
Server
Render
Response
Client-Side Rendering
Client-Side Rendering
Request
HTML
Server
Render
https://vueschool.io
Client-Side Rendering
Request
HTML
Server
Render
https://vueschool.io
No Rendering Step
Client-Side Rendering
Request
https://vueschool.io
Server
Render
The HTML files only references the necessary JavaScript files to render the HTML content in the browser
🔎
HTML
<!DOCTYPE html>
<html>
  <head> .. </head>

  <body>
  	<div id='app'></div>
    <script type="module" src="/src/main.ts"></script>
  </body>
</html>
Client-Side Rendering
Request
https://vueschool.io
Server
HTML
Response
Render
Client-Side Rendering
Request
https://vueschool.io
Server
HTML
Response
Render
Nuxt offers the best of both worlds
👑
👑
Universal Rendering
1.
Universal Rendering
1.
Universal rendering mode is enabled by default, right out of the box
Universal Rendering
1.
The server renders the .vue files and sends a fully rendered HTML response to the browser.
Universal Rendering
1.
The server renders the .vue files and sends a fully rendered HTML response to the browser.
The browser will receive the rendered HTML and display it to the user immediately.
Universal Rendering
1.
At this point, this is just typical server-side rendering
<!DOCTYPE html>
<html lang="en">
<head>
  <meta charset="UTF-8" />
  <title>Hello, world!</title>
</head>
  <body>
    <h1>Hello, world!</h1>
  </body>
</html>
Server
<!DOCTYPE html>
<html lang="en">
<head>
  <meta charset="UTF-8" />
  <title>Hello, world!</title>
</head>
  <body>
    <h1>Hello, world!</h1>
  </body>
</html>
Browser
Static HTML
Static HTML
Universal Rendering
1.
<!DOCTYPE html>
<html lang="en">
<head>
  <meta charset="UTF-8" />
  <title>Hello, world!</title>
</head>
  <body>
    <h1>Hello, world!</h1>
  </body>
</html>
Server
<!DOCTYPE html>
<html lang="en">
<head>
  <meta charset="UTF-8" />
  <title>Hello, world!</title>
</head>
  <body>
    <h1>Hello, world!</h1>
  </body>
</html>
Browser
Static HTML
Static HTML
But, Nuxt is secretly doing its magic behind the scenes 🤫
Universal Rendering
1.
<!DOCTYPE html>
<html lang="en">
<head>
  <meta charset="UTF-8" />
  <title>Hello, world!</title>
</head>
  <body>
    <h1>Hello, world!</h1>
  </body>
</html>
Server
<!DOCTYPE html>
<html lang="en">
<head>
  <meta charset="UTF-8" />
  <title>Hello, world!</title>
</head>
  <body>
    <h1>Hello, world!</h1>
  </body>
</html>
Browser
Static HTML
Static HTML

To keep client-side features like dynamic interfaces and transitions,
the browser loads JavaScript after the HTML is downloaded
Universal Rendering
1.
<!DOCTYPE html>
<html lang="en">
<head>
  <meta charset="UTF-8" />
  <title>Hello, world!</title>
</head>
  <body>
    <h1>Hello, world!</h1>
  </body>
</html>
Server
<!DOCTYPE html>
<html lang="en">
<head>
  <meta charset="UTF-8" />
  <title>Hello, world!</title>
</head>
  <body>
    <h1>Hello, world!</h1>
  </body>
</html>
Browser
Static HTML
Dynamic HTML
Vue.js then takes over to enable interactivity,
achieving universal rendering

Universal Rendering
1.
<!DOCTYPE html>
<html lang="en">
<head>
  <meta charset="UTF-8" />
  <title>Hello, world!</title>
</head>
  <body>
    <h1>Hello, world!</h1>
  </body>
</html>
Browser
Dynamic HTML
Making a static page interactive in the browser is known as 'hydration'
Universal Rendering
1.
<!DOCTYPE html>
<html lang="en">
<head>
  <meta charset="UTF-8" />
  <title>Hello, world!</title>
</head>
  <body>
    <h1>Hello, world!</h1>
  </body>
</html>
Browser
Dynamic HTML
After the initial page visit,
all subsequent navigation is handled entirely via client-side rendering. The page doesn't need to refresh again.
Universal Rendering
1.
Your Vue app runs once on the server to render HTML
And runs again on the browser to make the page interactive during the hydration process
2.
Client-Side Rendering
2.
Client-Side Rendering
The server sends back the response without rendering the HTML elements.
The entire Vue app is rendered in the browser.
HTML elements gets generated AFTER the browser downloads and executes the JavaScript files.
2.
Client-Side Rendering
export default defineNuxtConfig({
	ssr: false
})
You can enable the client-side mode by setting the ssr property to false in the nuxt.config.ts file
2.
Client-Side Rendering
We'll cover Nuxt configuration in more detail in a later chapter
This file is one of the files you get when you first install Nuxt
3.
Hybrid Rendering
3.
Hybrid Rendering
Previously, every route in a Nuxt app had to use the same rendering mode, either universal or client-side
3.
Hybrid Rendering
You can choose the rendering mode or caching rule for each page based on your needs
export default defineNuxtConfig({
  routeRules: {
     // Admin dashboard renders only on client-side
    '/admin/**': { ssr: false },
    // Homepage generated/pre-rendered at build time
    '/': { prerender: true },
    // Products page generated on demand, revalidates in background, cached until next change
    '/products': { swr: true },
    //  same as swr except that we are able to add the response to the
	// CDN cache on platforms that support this (currently Netlify or Vercel)
    '/blog/**': { isr: true }
  }
})
4.
Edge Rendering
4.
Edge Rendering
It allows your application to be rendered closer to users through CDN edge servers, improving performance and reducing latency
4.
Edge Rendering
It allows your application to be rendered closer to users through CDN edge servers, improving performance and reducing latency
A CDN (Content Delivery Network) is a network of distributed servers that deliver web content to users based on their geographic location, improving load times and reducing latency.
💡
Questions?
🙋🏾♀️
Exercise 2
👩💻👨🏽💻
Coffee Break
☕️
⏰ 15 mins
Pages, Components,
and Layouts
3
Section
Nuxt Pages
1.
By default, routing is disabled in a new Nuxt app.
The project only includes the App.vue component to render your content.
By default, routing is disabled in a new Nuxt app.
The project only includes the App.vue component to render your content.
Vue Router will not be included in your app's bundle.
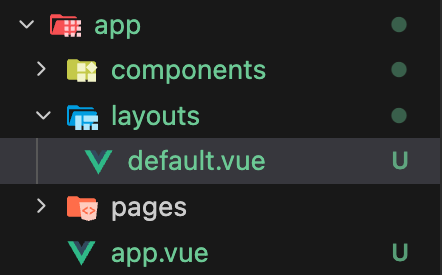
To enable routing in Nuxt,
create a pages directory in the app directory
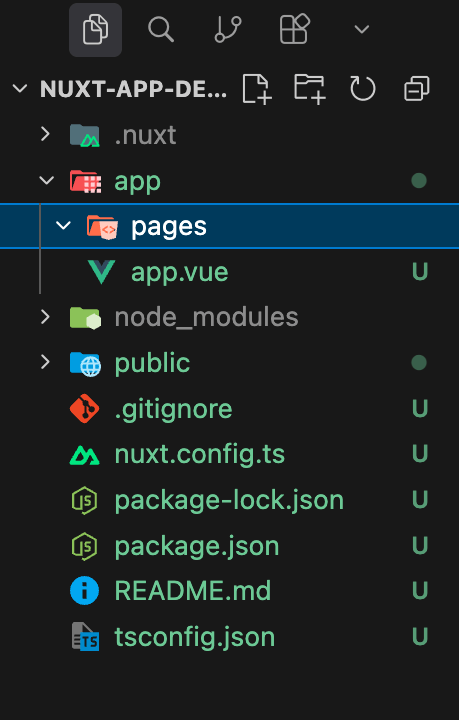
Then, use the <NuxtPage /> component in App.vue
<template>
  <div>
    <NuxtPage />
  </div>
</template>
Then, use the <NuxtPage /> component in App.vue
<template>
  <div>
    <NuxtPage />
  </div>
</template>
The App.vue component is optional in Nuxt.
If you don't need to customize the root component, you can remove it, and Nuxt will automatically create it for you behind the scenes.
💡
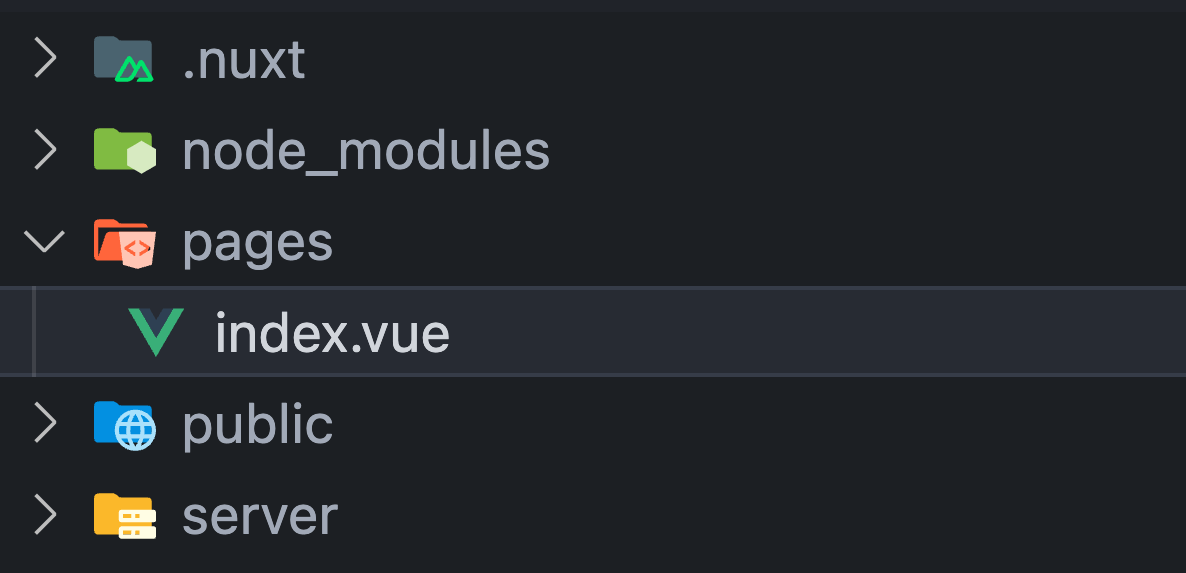
Each Vue file inside the pages/ directory generates a corresponding URL (or route) that displays the file's contents
Each Vue file inside the pages/ directory generates a corresponding URL (or route) that displays the file's contents
But those files needs to follow specific naming conventions
A file named index.vue nested directly inside the pages directory
will serve as the website's landing page (Homepage)
/
Landing Pages
If the index.vue file is nested under a directory, it will become the landing page for that route
/about
Landing Pages

If a file has any other name, Nuxt will use that name to define the route
/about
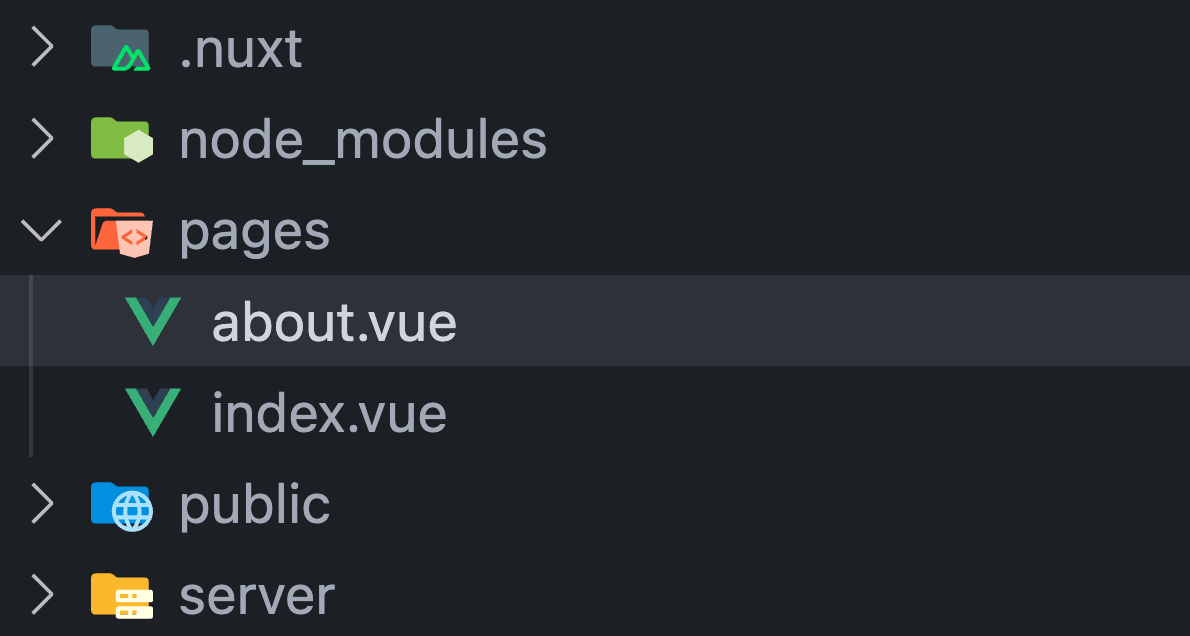
Landing Pages
/
You can create nested routes by placing a file inside a directory
/company/about
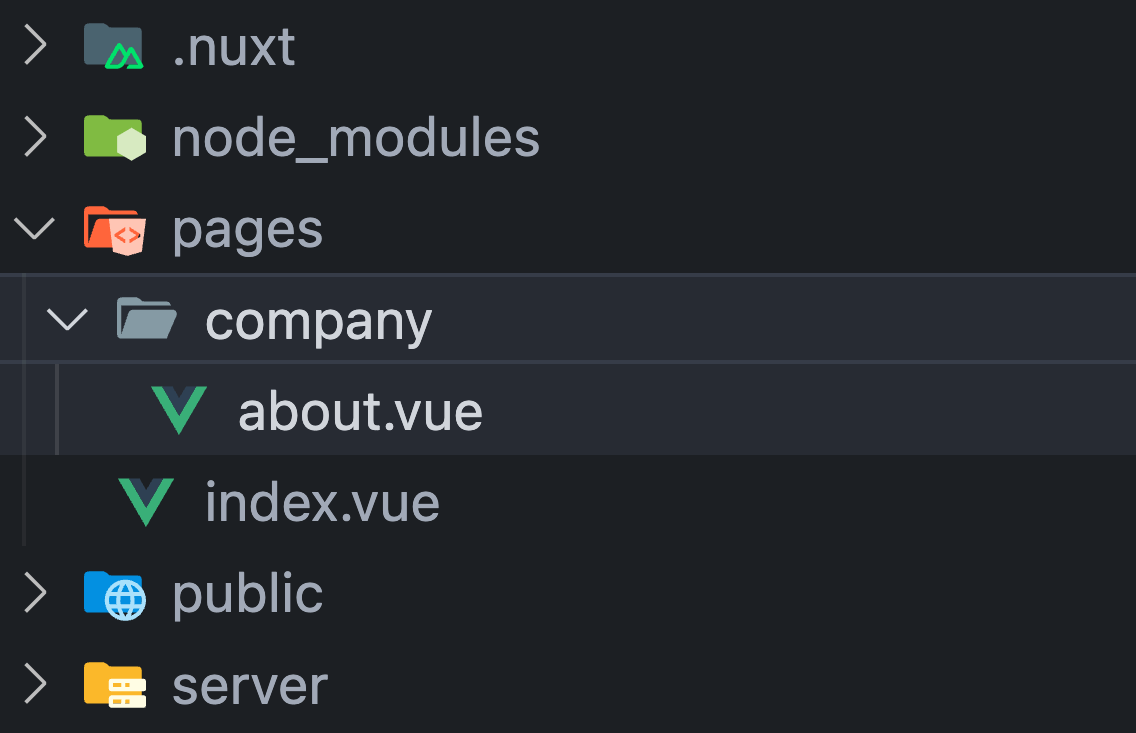
Nested Routes
Multiple routes can be grouped into a directory (enclosed in parentheses) without affecting file-based routing
/about
Grouped Routes

/contact
/
You can create routes with dynamic parameters
by placing the text within square brackets
/users/johndoe1
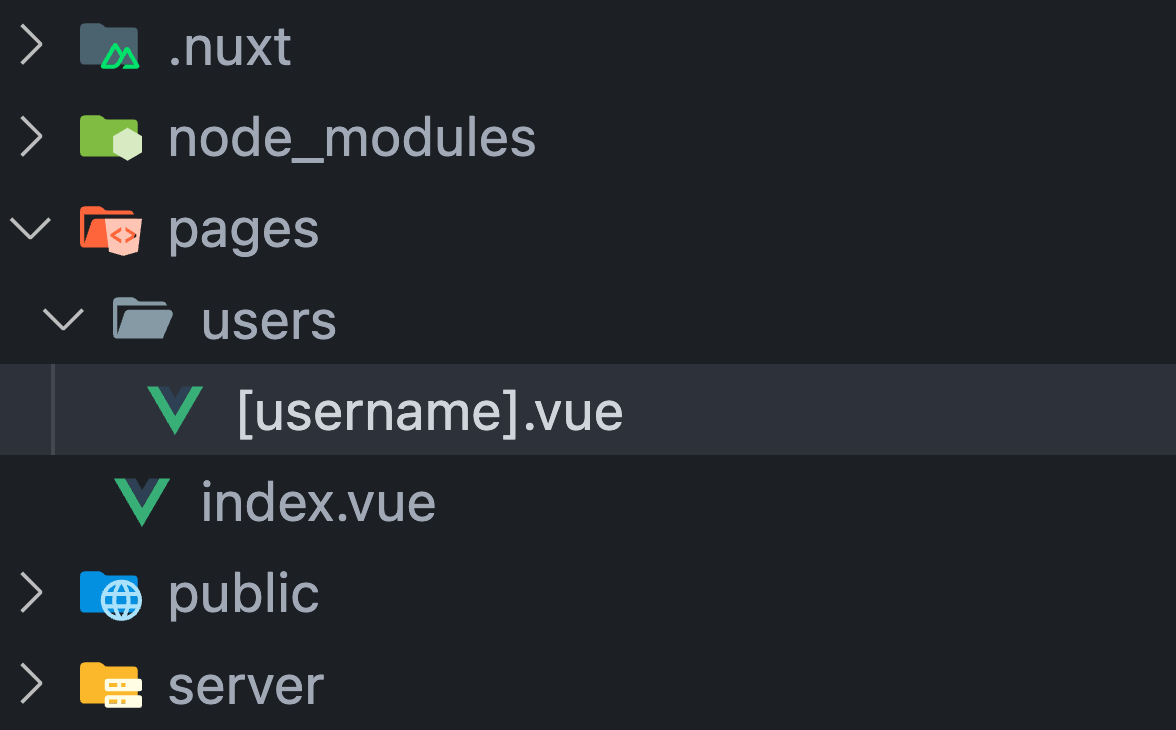
Dynamic Routes
It also works if used with directory names
/active-users/1

/inactive-users/1234
Dynamic Routes
(and even partial path parts)
If you want a parameter to be optional,
enclose it in double square brackets
/products/macbook

/products
Product: macbook
All Products
Dynamic Routes
Create catch-all routes by wrapping the file name in square brackets and prefixing it with three dots
/undefined-route
404 Page Not Found
Catch-All Routes

Create catch-all routes by wrapping the file name in square brackets and prefixing it with three dots
/undefined-route
404 Page Not Found
Catch-All Routes
Page components should generally have a single root element.
💡
// pages/about.vue
<template>
	<div>
		<!--  Page content -->
  	</div>
</template>
Navigation
To navigate between pages of your app, you should use the <NuxtLink> component
<template>
  <NuxtLink to="/">Home page</NuxtLink>
</template>
Navigation
The <NuxtLink> component ensures that internal navigation within the app won't trigger a full page reload
Navigation
The <NuxtLink> component ensures that internal navigation within the app won't trigger a full page reload
It makes page navigation work like a single-page application (SPA), avoiding a full page reload from the server for each new page
Navigation
The <NuxtLink> component ensures that internal navigation within the app won't trigger a full page reload
It makes page navigation work like a single-page application (SPA), avoiding a full page reload from the server for each new page
Under the hood, the <NuxtLink> component is a wrapper
around Vue Router's <RouterLink> component.
It renders as a regular anchor tag in the browser, but it functions differently.
💡
<a href="/">Home Page</a>Navigation
To navigate between pages of your app, you should use the <NuxtLink> component
<template>
  <NuxtLink to="/">Home page</NuxtLink>
</template>
The 'to' prop is required and is used to define the link path
Navigation
To navigate between pages of your app, you should use the <NuxtLink> component
<template>
  <NuxtLink to="/">Home page</NuxtLink>
</template>
The 'to' prop is required and is used to define the link path
You can still use the href attribute on the NuxtLink component—it's just an alias for the to prop. If both to and href are present, href will be ignored.
💡
Navigation
The value of the prop could be a string
<template>
  <NuxtLink to="/">Home page</NuxtLink>
</template>
Navigation
Or, it could be a RouteRecord object
<template>
  <NuxtLink :to="{ path: '/' }">Home page</NuxtLink>
</template>
Navigation
<template>
  <NuxtLink :to="{ path: '/' }">Home page</NuxtLink>
</template>
Don't forget to bind the prop
Or, it could be a RouteRecord object
Navigation
The object syntax can be used to define parameters and query strings
Navigation
Let's have a look at this example 👇
<NuxtLink
  :to="{
    name: 'products-category',
    params: { category: 'tech' },
    query: { sortBy: 'desc' },
  }"
> See Our Tech Products </NuxtLink>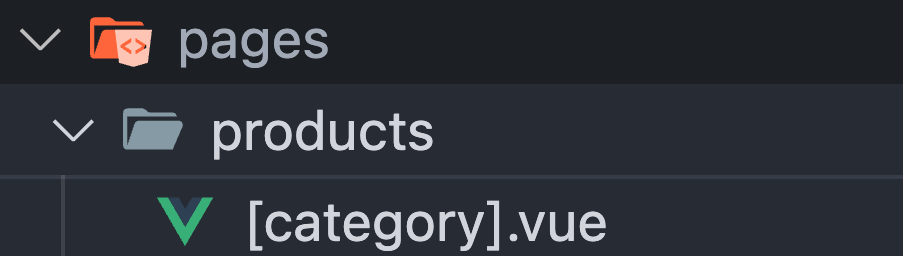
Navigation
<NuxtLink
  :to="{
    name: 'products-category',
    params: { category: 'tech' },
    query: { sortBy: 'desc' },
  }"
> See Our Tech Products </NuxtLink>
/products/tech?sortBy=desc
Let's have a look at this example 👇
Navigation
<NuxtLink
  :to="{
    name: 'products-category',
    params: { category: 'tech' },
    query: { sortBy: 'desc' },
  }"
> See Our Tech Products </NuxtLink>
/products/tech?sortBy=desc
Let's have a look at this example 👇
You can get the page's route name name using
Nuxt DevTools, which is enabled by default in new Nuxt apps.
💡

Navigation
<script setup>
const navigateToTechProducts = () => {
  navigateTo({
    name: "products-category",
    params: {
      category: "tech",
    },
    query: {
      sortBy: "desc",
    },
  });
};
</script>

<template>
  <button @click="navigateToTechProducts">See Our Tech Products</button>
</template>
The navigateTo() helper can be used for programmatic navigation
Navigation
<script setup>
const navigateToTechProducts = () => {
  navigateTo('products/tech?sortBy=desc');
};
</script>

<template>
  <button @click="navigateToTechProducts">See Our Tech Products</button>
</template>
The navigateTo() helper can be used for programmatic navigation
or use the path string
Page Meta
Nuxt enables us to attach Meta data to the page
Page Meta
We can use the definePageMeta macro in pages components
to define meta data for the page
<script setup>
definePageMeta({
  title: "My about page",
  name: "custom-name",
});
</script>

<template>
  <div>
    <p>Meta Title: {{ $route.meta.title }}</p>
    <p>Route Name: {{ $route.name }}</p>
  </div>
</template>
Components
2.
All components must be placed inside the components directory
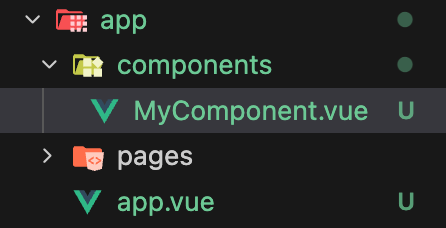
<script setup>
// No imports needed..
</script>

<template>
  <MyComponent />
</template>
Nuxt automatically imports all components in this directory
Component Names
Component names are registered based on
their directory path and filename
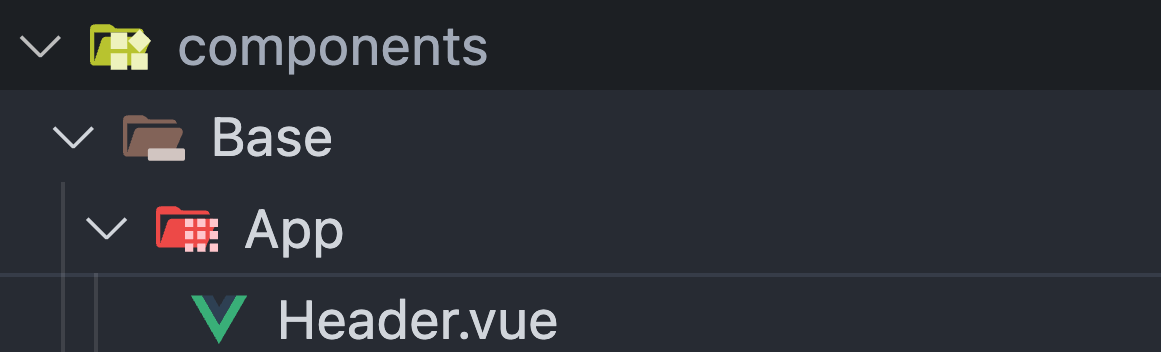
<template>
  <BaseAppHeader />
</template>
Component Names
If the component is already named according to its path,
Nuxt will not append the path to the name.
Instead, it will register the component using the existing name
<template>
  <BaseAppHeader />
</template>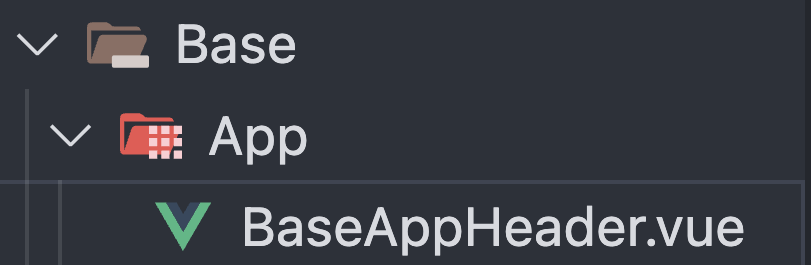
Dynamic Imports
To dynamically import a component (also known as lazy-loading),
simply add the Lazy prefix to the component's name.
<template>
  <LazyBaseAppHeader v-if="condition" />
</template>
Dynamic Imports
To dynamically import a component (also known as lazy-loading),
simply add the Lazy prefix to the component's name.
<template>
  <LazyBaseAppHeader v-if="condition" />
</template>
Use import.meta.server/client to conditionally execute code based on the environment
💡
<script setup>
if (import.meta.server) {
  // Execute only on the server
}
if (import.meta.client) { // or import.meta.browser
  // Execute only on the client/browser
}
</script>
Nuxt has many helpful built in components
Built-in Components
- <NuxtPage>
- <NuxtLink>
- <ClientOnly>
- <NuxtRouteAnnouncer>
- <NuxtLoadingIndicator>
- <NuxtIsland>
- <NuxtLayout>
And more..
Built-in Components
3.
Layouts


Different pages can have different layouts
3.
Layouts
3.
Layouts
Layouts are enabled by adding <NuxtLayout> to the App.vue file
<template>
  <NuxtLayout>
    <NuxtPage />
  </NuxtLayout>
</template>
3.
Layouts
Create the layouts directory in the app directory

3.
Layouts
Inside the layouts directory, the default.vue component will be used as the default layout for all pages.
3.
Layouts
Layout components should have a single root element.
// layouts/default.vue
<template>
  <div>
    <nav></nav>
    <SidebarComponent />
    <main></main>
    <footer></footer>
  </div>
</template>
3.
Layouts
// layouts/default.vue
<template>
  <div>
    <nav></nav>
    <SidebarComponent />
    <main>
    	<slot />
    </main>
    <footer></footer>
  </div>
</template>
In a layout file, the content of the page
will be displayed in the <slot />
3.
Layouts
We can add as many custom layouts as we want

3.
Layouts
To choose the desired layout in the page component,
we can use the definePageMeta macro
// pages/profile.vue
<script setup>
definePageMeta({
  layout: 'custom'
})
</script>
3.
Layouts
Layout can also be specified dynamically at runtime
by using the setPageLayout helper from Nuxt
// pages/about.vue
<script setup>
const enableCustomLayout = () => {
  setPageLayout('custom')
}
</script>

<template>
  <div>
    <button @click="enableCustomLayout">Update layout</button>
  </div>
</template>
3.
Layouts
Alternatively, the <NuxtLayout> component accepts a name prop
// App.vue
<script setup lang="ts">
// You might choose this based on an API call or logged-in status
const layout = "custom";
</script>

<template>
  <NuxtLayout :name="layout">
    <NuxtPage />
  </NuxtLayout>
</template>
3.
Layouts
If we want to use the <NuxtLayout> component directly in pages instead of App.vue, set layout to false and use the name prop
// pages/about.vue
<script setup>
definePageMeta({
  layout: false,
})
</script>

<template>
  <div>
    <NuxtLayout name="custom">
      The rest of the page
    </NuxtLayout>
  </div>
</template>
💡 Not Common
Questions?
🙋🏾♀️
Exercise 3
👩💻👨🏽💻
Coffee/Launch Break
☕️
⏰ 25 mins
Data Fetching
4
Section
In Nuxt's universal mode, any fetch request in script setup will be triggered twice
<script setup>
  const data = ref()
try {
  const result = await fetch("api/endpoint");
  data.value = result
} catch (error) {
  console.log(error);
}
</script>
Let's take a look at this code
The fetch request will be executed on the server
Let's take a look at this code
<script setup>
  const data = ref()
try {
  const result = await fetch("api/endpoint");
  data.value = result
} catch (error) {
  console.log(error);
}
</script>
Then, it will be executed again in the browser
The fetch request will be executed on the server
<script setup>
  const data = ref()
try {
  const result = await fetch("api/endpoint");
  data.value = result
} catch (error) {
  console.log(error);
}
</script>
Let's take a look at this code
Nuxt provides 3 main ways to fetch data
To solve this..
Nuxt provides 3 main ways to fetch data
useFetch()$fetch()useAsyncData()
1.
useFetch
1.
useFetch
<script setup>
const { data, error } = await useFetch('/api/endpoint')
</script>
useFetch is the most straightforward way for fetching data
1.
useFetch
<script setup>
const { data, error } = await useFetch('/api/endpoint')
</script>
We must always use await with useFetch() and useAsyncData() composables
1.
useFetch
<script setup>
const { data, error } = await useFetch('/api/endpoint')
</script>
It takes a string of the api endpoint as the first argument
1.
useFetch
useFetch should only be used directly in a setup function, plugin, or route middleware.
💡
<script setup>
const { data, error } = await useFetch('/api/endpoint')
</script>
It takes a string of the api endpoint as the first argument
1.
useFetch
The useFetch composable supports network requests de-duplication
1.
useFetch
The useFetch composable supports network requests de-duplication
Requests made on the server won't trigger again on the client-side
1.
useFetch
The fetch request will be executed on the server
<script setup>
const { data } = await useFetch('/api/dadjokes')
</script>
1.
useFetch
Since the API call is made on the server, the data is forwarded to the client in the payload
The fetch request will be executed on the server
<script setup>
const { data } = await useFetch('/api/dadjokes')
</script>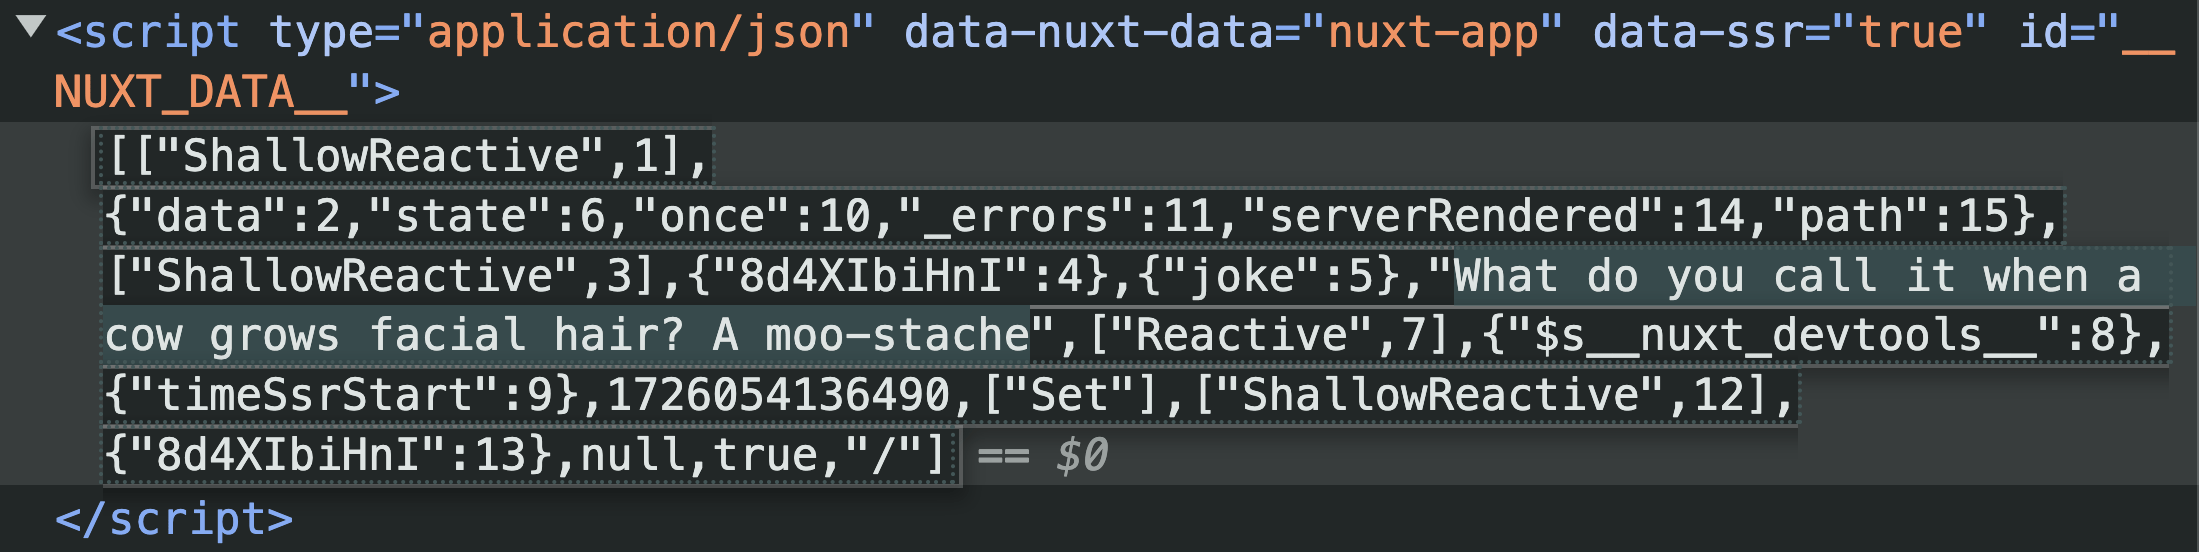
1.
useFetch
<script setup>
const { data } = await useFetch("/api/dadjokes");
</script>

<template>
  <p>{{ data?.joke }}</p>
</template>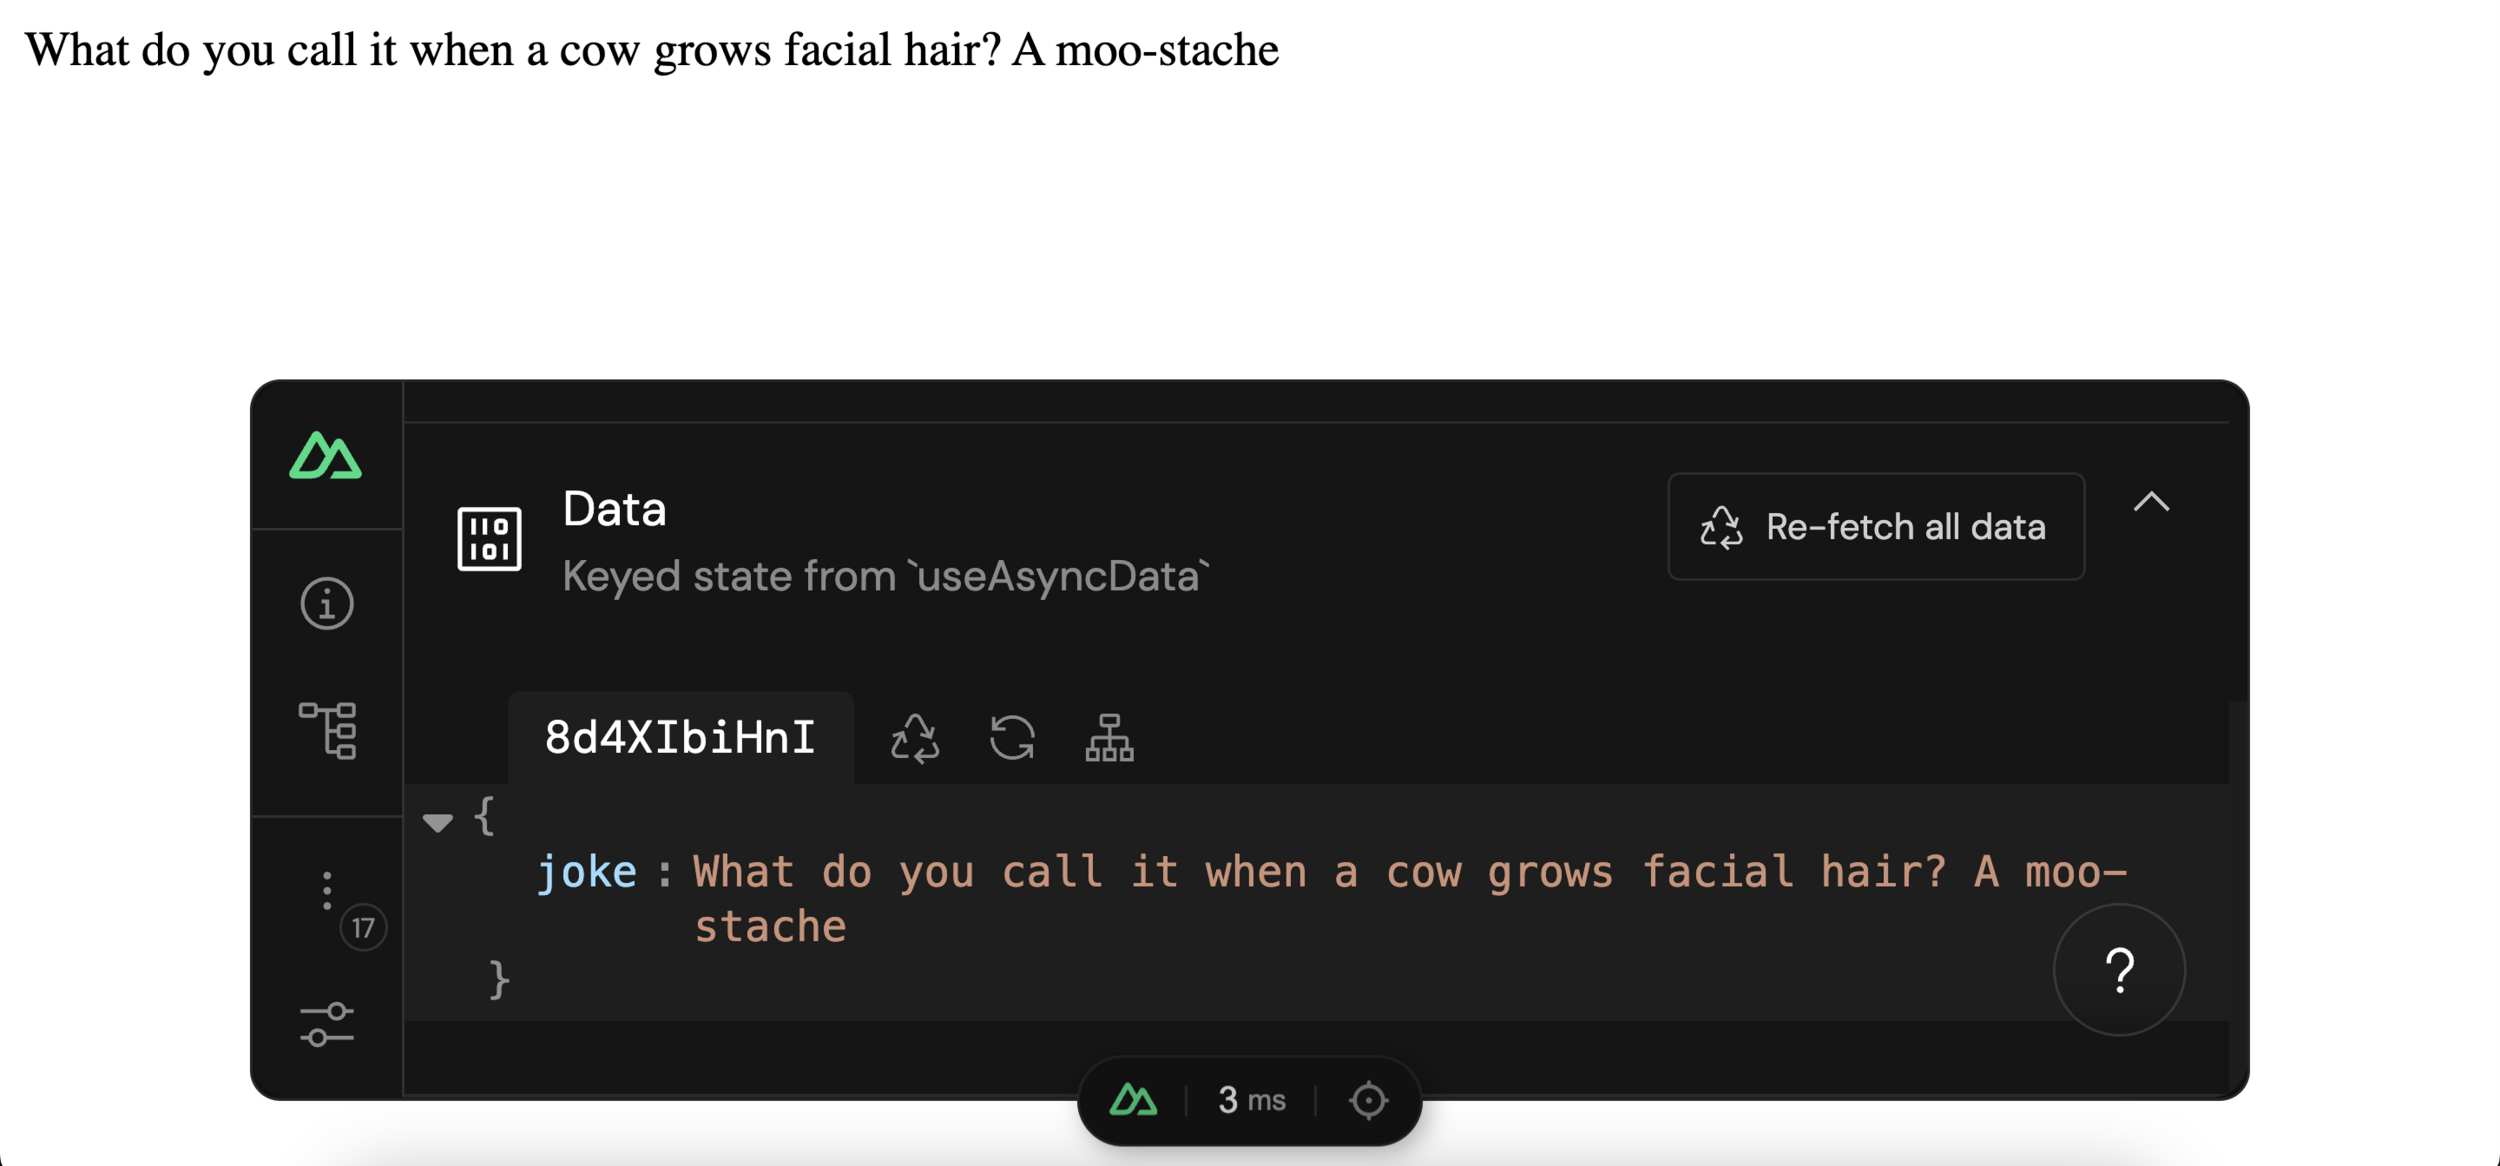
You can view Nuxt Payload data in the devtools
1.
useFetch
<script setup>
const { data } = await useFetch("/api/dadjokes");
</script>

<template>
  <p>{{ data?.joke }}</p>
</template>
Text
Auto-generated key for the fetched data
Text
1.
useFetch
<script setup>
const { data } = await useFetch("/api/dadjokes");
</script>

<template>
  <p>{{ data?.joke }}</p>
</template>
Text
Auto-generated key for the fetched data
Text
The fetched data forwarded to the client-side
1.
useFetch
<script setup>
const { data, error } = await useFetch('/api/endpoint')
</script>
The composable will always return an object with many properties:
{ data, status, error, refresh, execute, clear } and others
1.
useFetch
{
data,
status,
error,
refresh,
execute,
clear
}
All three are Refs and should be accessed with .value
1.
useFetch
{
data,
status,
error,
refresh,
execute,
clear
}
All three are Refs and should be accessed with .value
All three are functions
1.
useFetch
We can pass some helpful options to useFetch
<script setup>
const { data, error } = await useFetch('/api/endpoint', {
  // options..
})
</script>
1.
useFetch
<script setup>
const { data, error } = await useFetch('/api/endpoint', {
  pick: ['title'],
})
</script>
If the handler function returns a single object, the pick option allows selecting specific keys from it
(only picked keys added to Nuxt payload)
1.
useFetch
<script setup>
const { data, error } = await useFetch('/api/endpoint', {
  server: false,
})
</script>
Change to false if you want to prevent firing the fetch request
on the server (Defaults to true)
1.
useFetch
<script setup>
const { data, error } = await useFetch('/api/endpoint', {
  lazy: true,
})
</script>
Do NOT block route navigation (defaults to false)
1.
useFetch
Show example in codebase
branch: example/lazy-vs-server
1.
useFetch
<script setup>
const { data, error } = await useFetch('/api/endpoint', {
  transform: (result) => {
    const changedResult = // Do something with the result
    return changedResult
  }
})
</script>
The transform option is a function used to modify the handler function's result.
1.
useFetch
There are many other great options to explore:
2.
$fetch
2.
$fetch
<script setup>
const result = await $fetch('/api/endpoint')
</script>
The $fetch() function is to perform a simple fetch request
2.
$fetch
<script setup>
const result = await $fetch('/api/endpoint')
</script>
The $fetch() function is to perform a simple fetch request
The $fetch function will not provide network calls de-duplication
💡
2.
$fetch
<script setup>
const submitComment = async () => {
  const comment = await $fetch('/api/comments', {
    method: 'POST',
    body: {
      // Comment data
    }
  })
}
</script>
It is recommended to use $fetch for client-side interactions (event based)
or combined with useAsyncData()
2.
$fetch
<script setup>
const submitComment = async () => {
  const comment = await $fetch('/api/comments', {
    params: {
      id: 123
    }
  })
}
</script>
We can pass an object as the second argument with the preferred options
The $fetch() utility is using the ofetch package under the hood.
Explore the ofetch repo for more usage info:
2.
$fetch
3.
useAsyncData()
<script setup>
const { data, error } = await useAsyncData(() => $fetch('/api/endpoint'))
</script>
useAsyncData() is another way to fetch data in Nuxt
3.
useAsyncData()
3.
useAsyncData()
<script setup>
const { data, error } = await useAsyncData('users-comments', () => getComments())
</script>
It accepts a string as the first argument to define a unique key for the fetched data in the payload (recommended)
It accepts a string as the first argument to define a unique key for the fetched data in the payload (recommended)
3.
useAsyncData()
<script setup>
const { data, error } = await useAsyncData('users-comments', () => getComments())
</script>
The key is used to de-duplicate the call across requests
3.
useAsyncData()
<script setup>
const { data, error } = await useAsyncData(() => getComments())
</script>
If no key provided, Nuxt will auto generate a key
based on the filename and line number of the call
3.
useAsyncData()
<script setup>
const { data, error } = await useAsyncData(() => $fetch('/api/endpoint'))
</script>
<script setup>
const { data, error } = await useFetch('/api/endpoint')
</script>
Nearly equivalent to
<script setup>
const { data, error } = await useAsyncData(() => $fetch('/api/endpoint'))
</script>
3.
useAsyncData()
<script setup>
const { data, error } = await useFetch('/api/endpoint')
</script>
Nearly equivalent to
In fact, useFetch is using useAsyncData under the hood
<script setup>
const { data, error } = await useAsyncData(() => $fetch('/api/endpoint'))
</script>
3.
useAsyncData()
<script setup>
const { data, error } = await useFetch('/api/endpoint')
</script>
Nearly equivalent to
But It's designed for different use cases
In fact, useFetch is using useAsyncData under the hood
<script setup>
const { data } = await useAsyncData('users-comments', async () => {

  const usersIds = await getUsersIds()
  const usersComments = await getComments(usersIds)

  return usersComments

})
</script>
3.
useAsyncData()
With useAsyncData(), we can make multiple fetch requests,
and it will return the data only once all promises are resolved
<script setup>
const { data } = await useAsyncData('users-comments', async () => {

  const usersIds = await getUsersIds()
  const usersComments = await getComments(usersIds)

  return usersComments

})
</script>
3.
useAsyncData()
We can add async to the callback to control the order of request execution with await, especially if one request depends on the result of another
<script setup>
const { data: discounts, status } = await useAsyncData('cart-discount', async () => {
  const [coupons, offers] = await Promise.all([
    $fetch('/cart/coupons'),
    $fetch('/cart/offers')
  ])

  return { coupons, offers }
})
</script>
3.
useAsyncData()
Also, we can use async to await Promise.all with multiple unrelated requests, ensuring they execute in parallel.
<script setup>
const getComments = async () => {
  const { data, error } = await supabase.from('comments').select()

  if(error) return // handle error

  return data
}

const { data } = await useAsyncData('users-comments', () => getComments())
</script>
3.
useAsyncData()
useAsyncData() is also useful when dealing with a third-party query layer
For example, working with Supabase or Firebase SDKs
<script setup>
const getComments = async () => {
  const { data, error } = await supabase.from('comments').select()

  if(error) return // handle error

  return data
}

const { data } = await useAsyncData('users-comments', () => getComments())
</script>
3.
useAsyncData()
In this example, we don't return the data directly; instead, we handle the incoming data from the SDK before returning it
useAsyncData() returns almost the same properties
we get from useFetch()
3.
useAsyncData()
<script setup>
const { data, error } = await useAsyncData(() => getComments())
</script>
<script setup>
const { data, error } = await useFetch('/api/endpoint')
</script>
If a simple fetch request is needed,
it's more straightforward to just use useFetch()
3.
useAsyncData()
<script setup>
const { data, error } = await useAsyncData(() => $fetch('/api/endpoint'))
</script>
By default, useFetch() and useAsyncData() will block the navigation until the data is fetched
To prevent this behavior, we can set the lazy option to true
<script setup>
const { data, error } = await useFetch('/api/endpoint', {
  lazy: true
})
</script>
<script setup>
const { data, error } = await useAsyncData(() => {
    $fetch("/api/endpoint");
  },
  { lazy: true }
);
</script>
Or, use useLazyFetch and useLazyAsyncData composables
<script setup>
const { data, error } = await useLazyFetch('/api/endpoint')
</script>
<script setup>
const { data, error } = await useLazyAsyncData(() => {
    $fetch("/api/endpoint");
  }
);
</script>
Caching Responses
View branch - example/data-cache-example
Questions?
🙋🏾♀️
Exercise 4
👩💻👨🏽💻
Error Handling
5
Section
Error Page
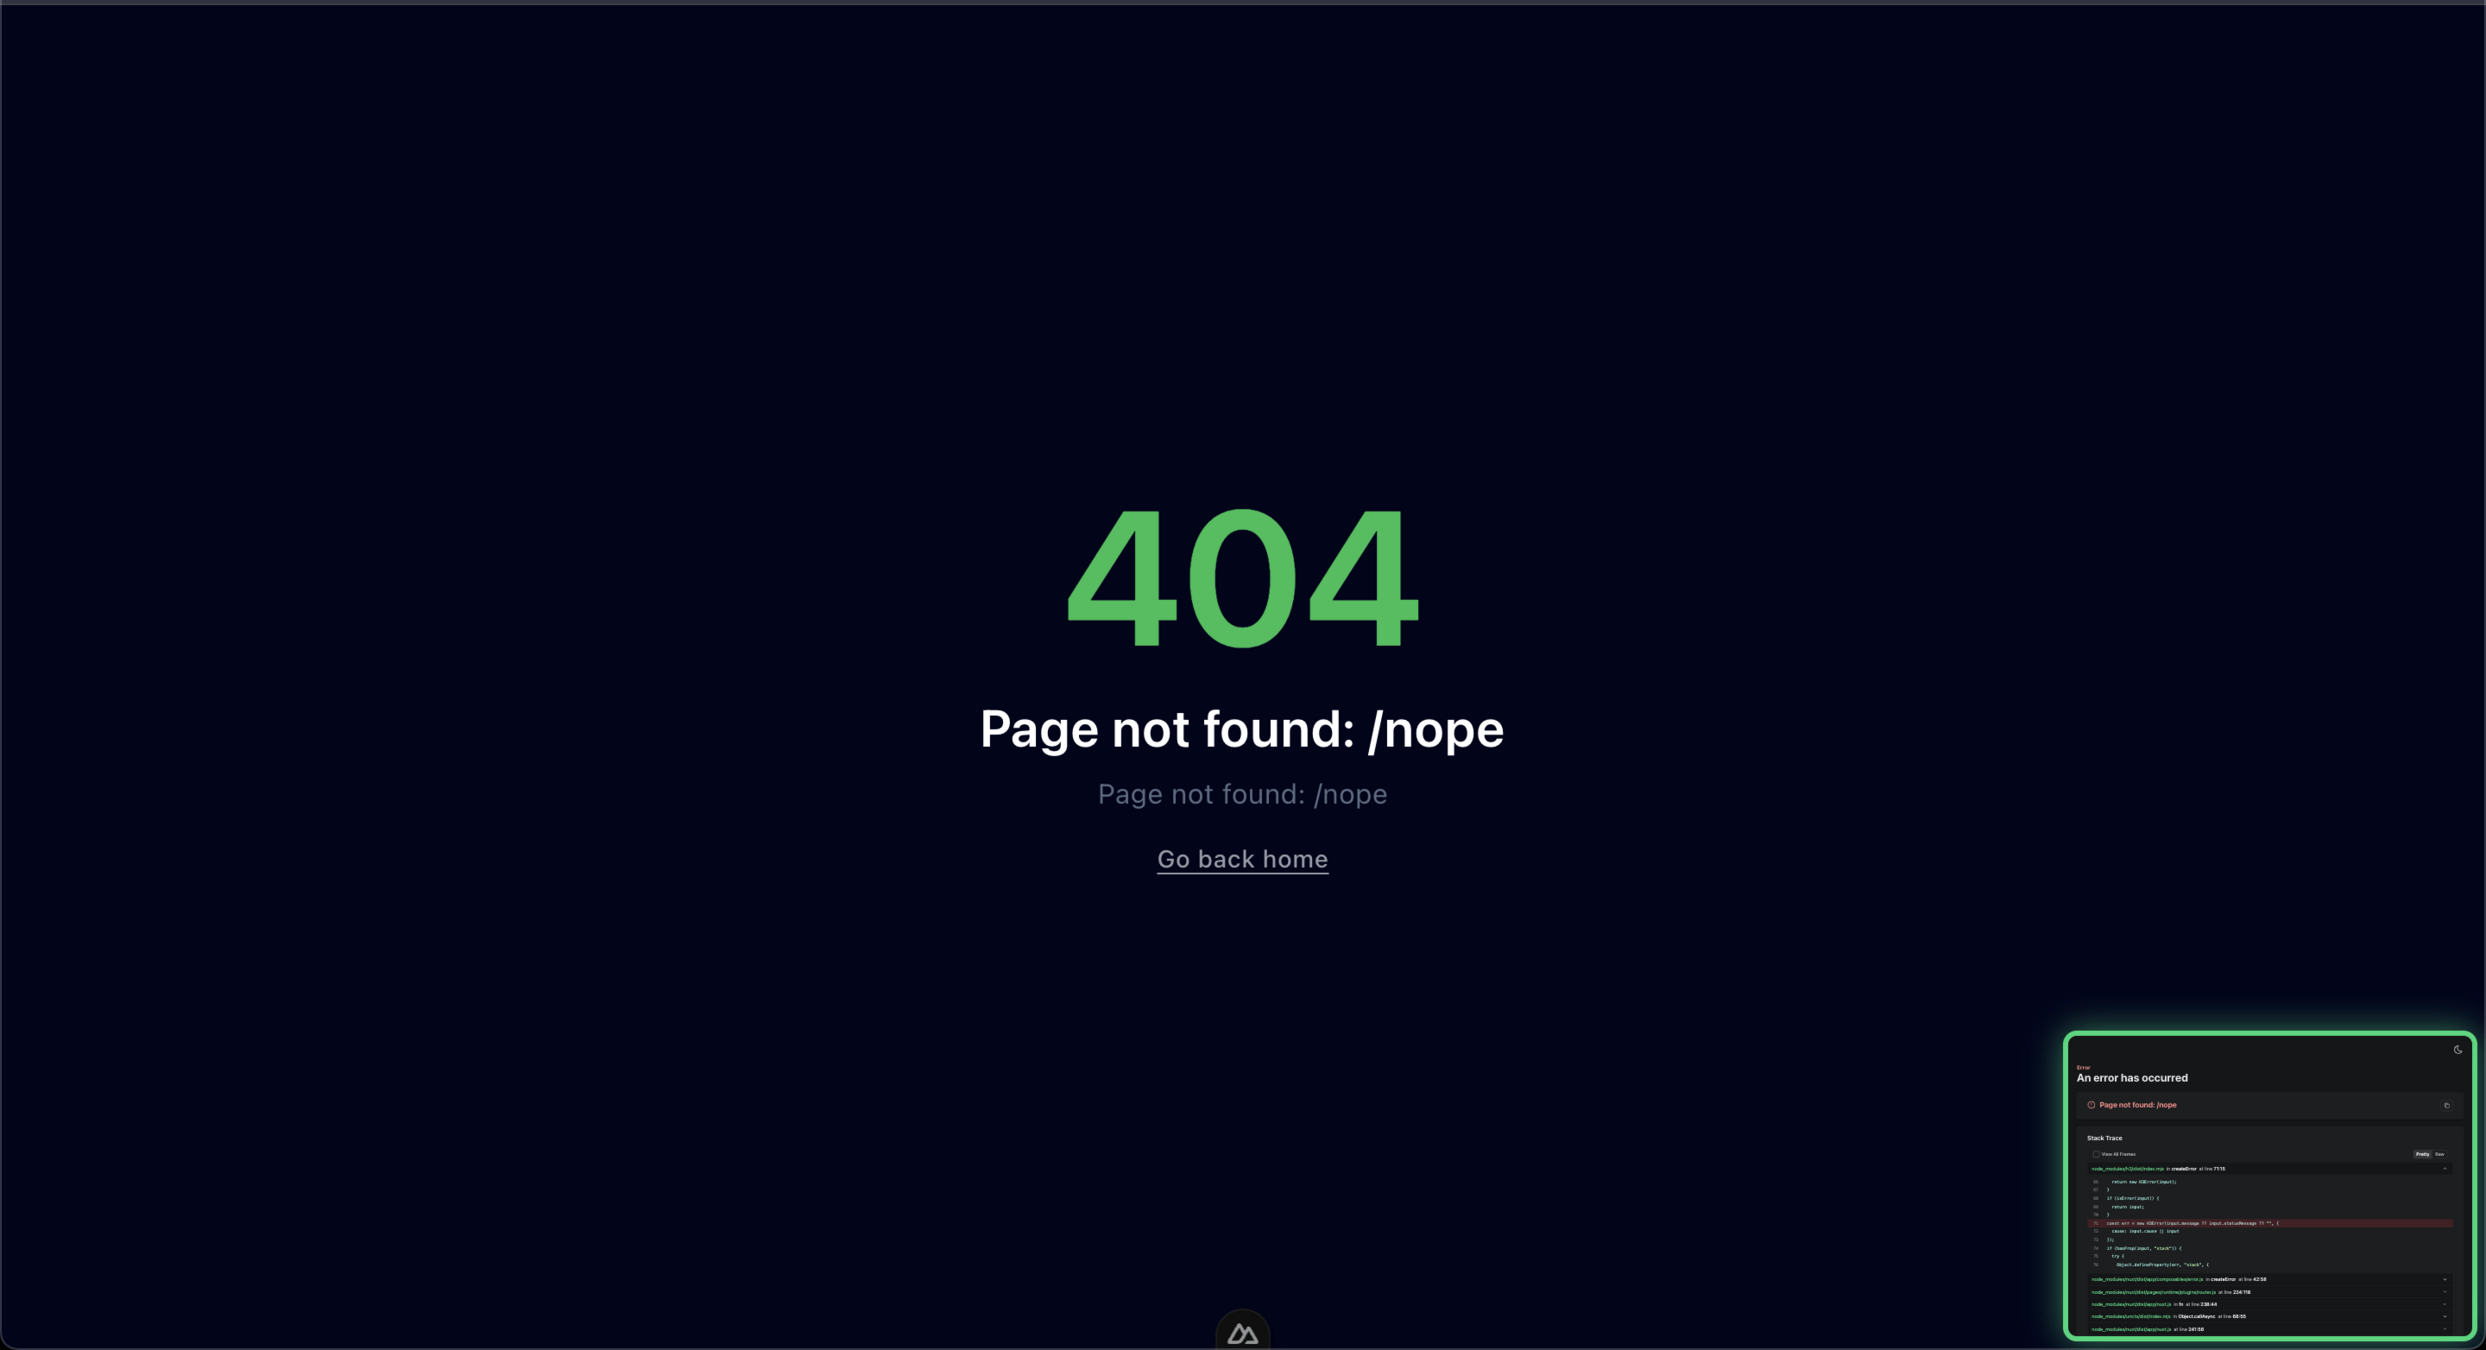
By default, Nuxt displays an error page when it encounters a fatal error

In dev mode, you can toggle back and forth between end user error pages and dev mode error pages
It will also render a default error page for undefined routes
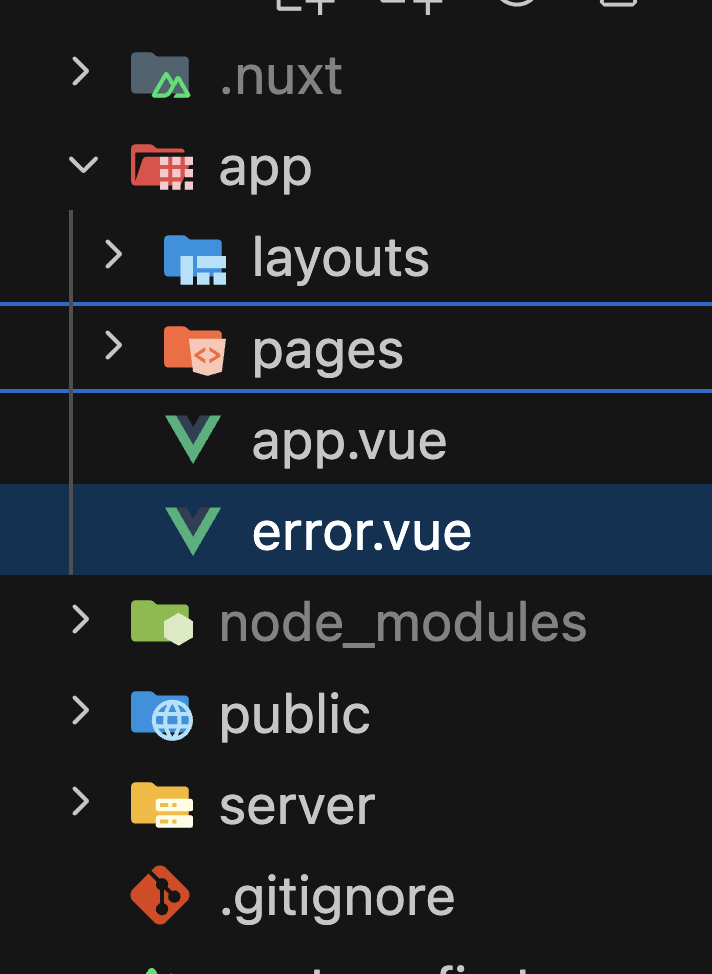
We can fully customize the error page by creating an error.vue component in the app directory
<script setup lang="ts">
import type { NuxtError } from '#app'

const props = defineProps({
  error: Object as () => NuxtError,
})

const handleError = () => clearError({ redirect: '/' })
</script>

<template>
  <div>
    <h2>{{ error?.status }}</h2>
    <button @click="handleError">
      Clear errors
    </button>
  </div>
</template>
The Nuxt error page is not a route.
Therefore, it can't go inside the pages directory.
Since it's not really a route/page,
We can't use definePageMeta in the error.vue component
<script setup>
definePageMeta({})
</script>

<template>
  <div>
  </div>
</template>
The error.vue component accepts the error as a prop,
which can be used to access the error details
<!--error.vue-->
<script setup lang="ts">
import type { NuxtError } from '#app'

const props = defineProps<{
  error: NuxtError
}>();
</script>

<template>
  <div>
    <!-- Status Code-->
    <h2>{{ error.status ?? error.statusCode }}</h2>
    <!--User Friendly Message-->
    <p>{{ error.statusText ?? error.statusMessage }}</p>
    <!--Developer Friendly Message-->
    <p>error.message</p>
    <!--More Error Data-->
    <p>{{ error.cause }}</p>
    <p>{{ error.stack }}</p>
  </div>
</template>
Clear Errors and Redirect
<!-- error.vue-->
<template>
  <div>
    <!-- ...-->
    <button @click="clearError({ redirect: '/' })">
      Go home
    </button>
  </div>
</template>
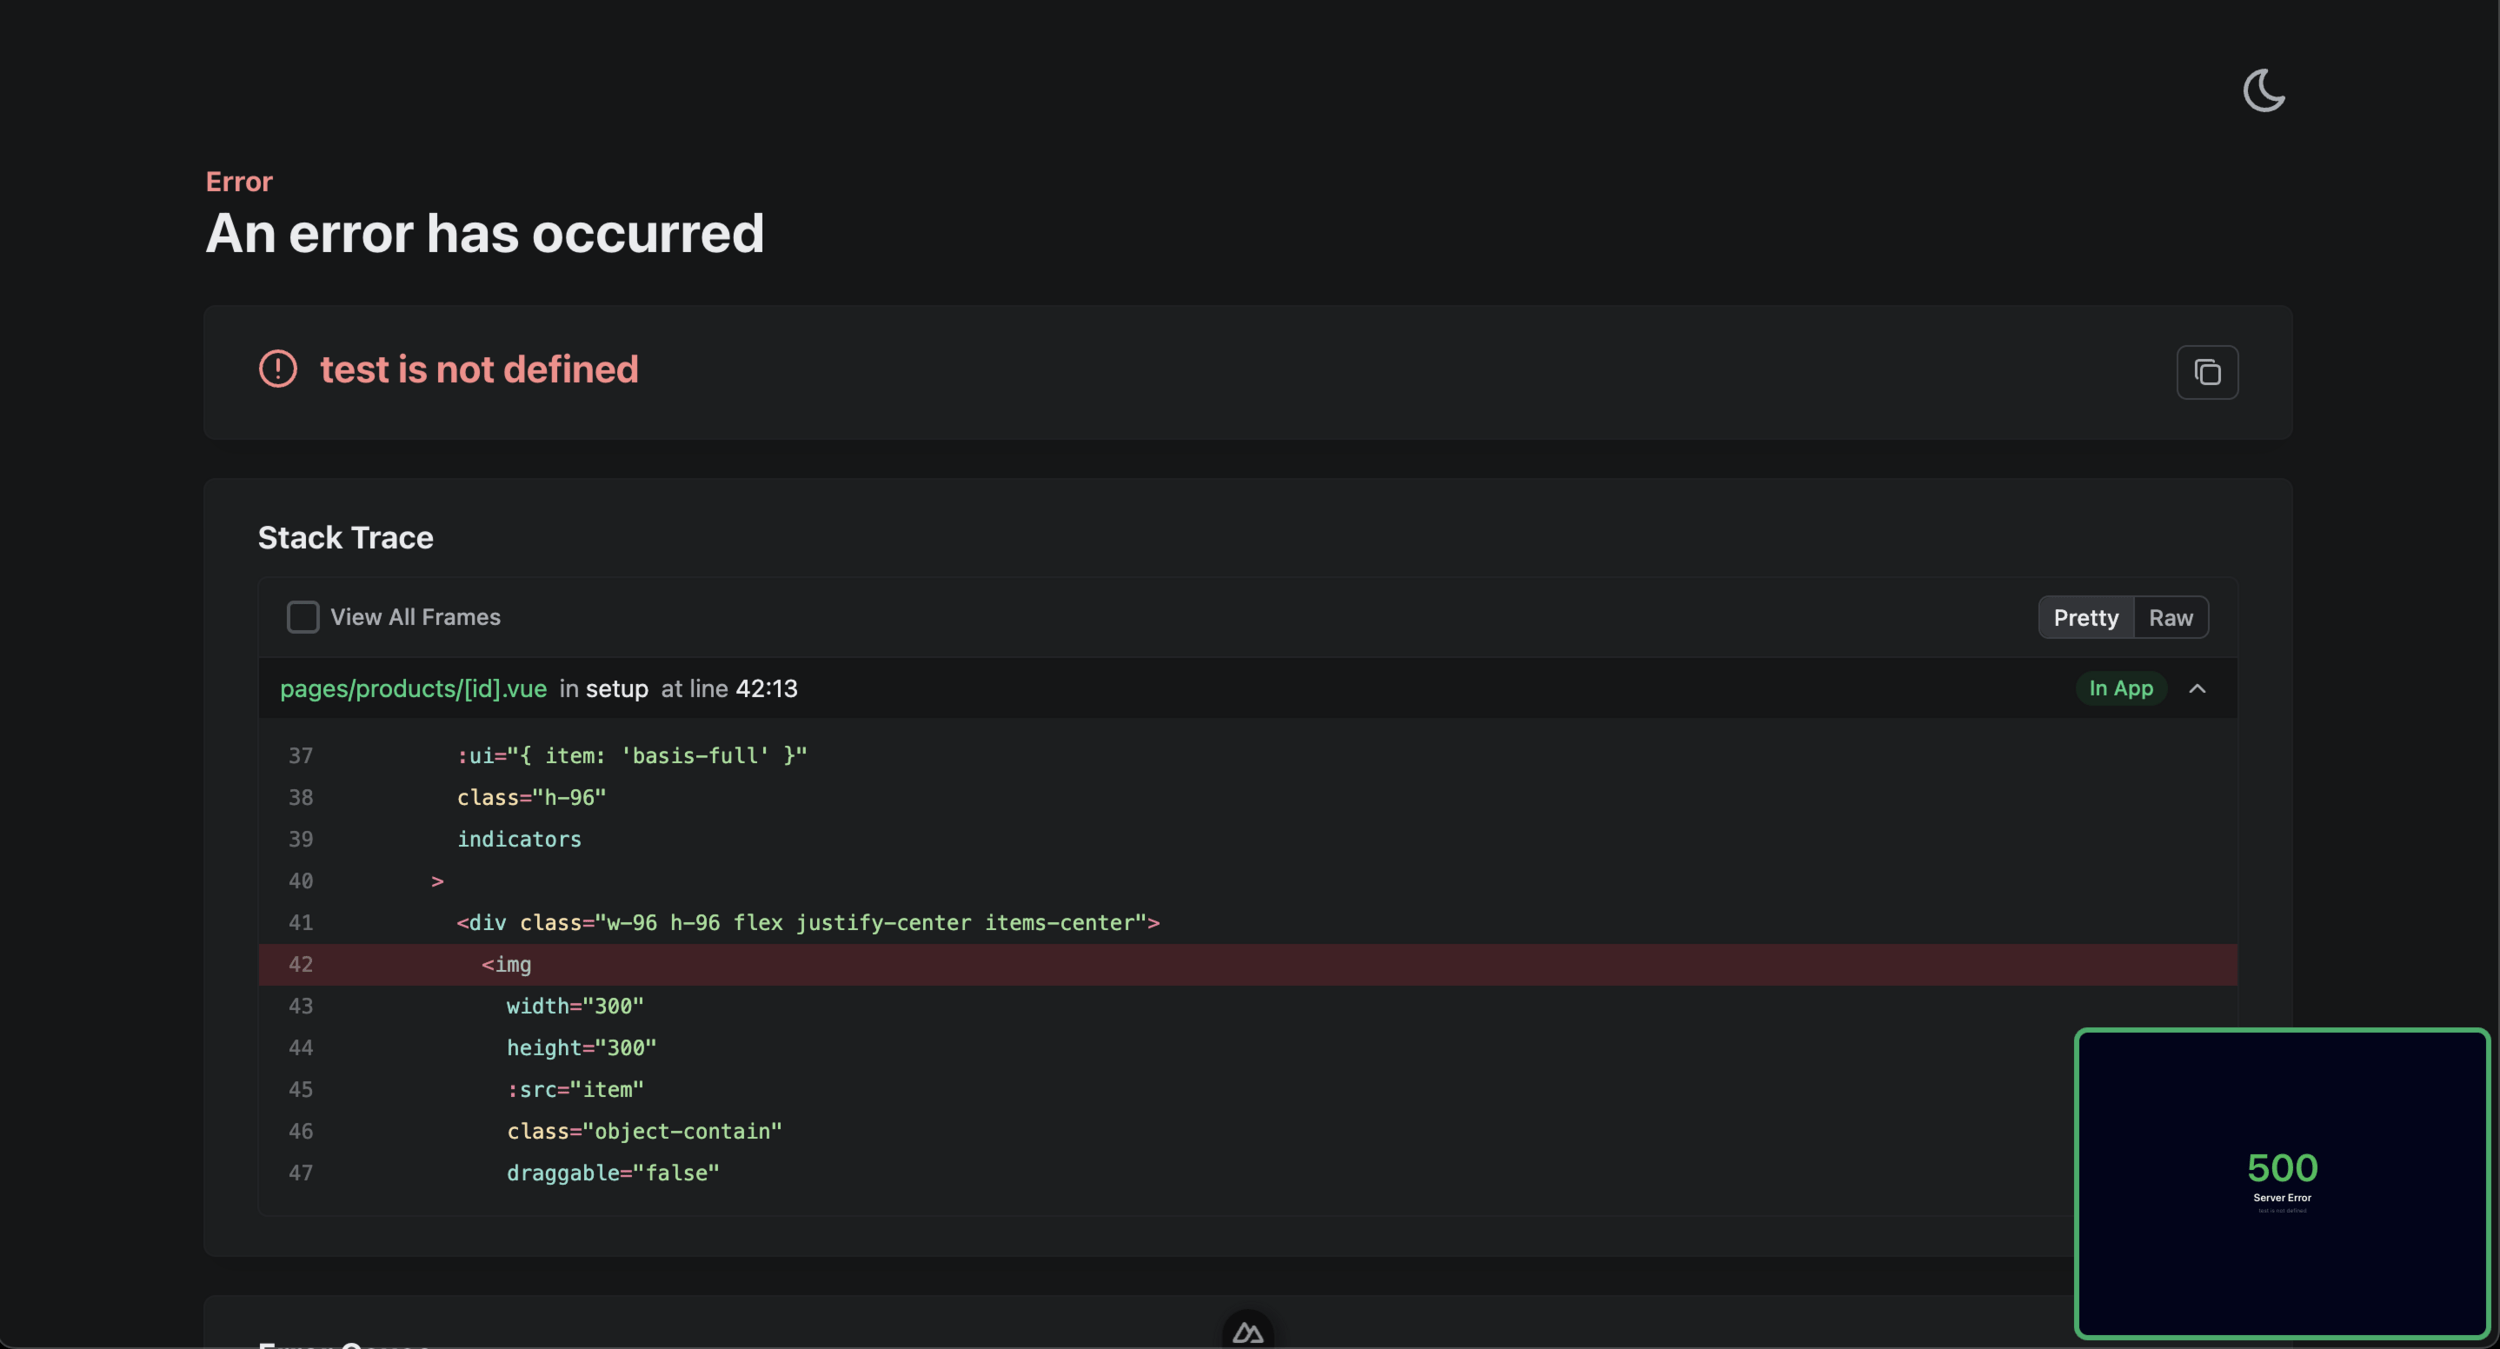
Create Errors
To manually throw an error and render the error page,
we can use the createError function
<script setup>
const slug = 'the-lord-of-the-rings'
const { data, error } = await useFetch(`/api/books/${slug}`)

if (error.value) {
  throw createError({ statusCode: 404, statusMessage: 'Page Not Found' })
}
</script>
If called on the client side,
the createError will not render the error page
<script setup>
const books = ref([]);
const fetchBook = async () => {
  const result = await $fetch("/api/books/the-lord-of-the-rings");

  if (!result) {
    throw createError({ statusCode: 404, statusMessage: "Book Not Found" });
  }

  books.value.push(result);
};
</script>

<template>
  <button @click="fetchBook">Get Favorite Book</button>
</template>
If we want to get the error page to render,
we must set the fatal option to true in the createError function
<script setup>
const books = ref([]);
const fetchBook = async () => {
  const result = await $fetch("/api/books/the-lord-of-the-rings");

  if (!result) {
    throw createError({
      statusCode: 404,
      statusMessage: "Book Not Found",
      fatal: true,
    });
  }

  books.value.push(result);
};
</script>
Another way to render the error page,
is by using the showError function
<script setup>
const books = ref([]);
const fetchBook = async () => {
  const result = await $fetch("/api/books/the-lord-of-the-rings");

  if (!result) {
    showError({
      statusCode: 404,
      statusMessage: "Book Not Found"
    })
  }

  books.value.push(result);
};
</script>
According to the docs, It is recommended to use
throw createError() instead of showError()
💡
Vue Errors
In Vue.js, errors propagate in a way similar to events in the DOM
They bubble up from the component that caused the error to its parent, and continue up the chain hitting the root component (App.vue)
<script setup>
onErrorCaptured((error) => {
  // Do what you want with the error
})
</script>
The onErrorCaptured Vue lifecycle hook can be used to catch any error thrown in a descendant component
<script setup>
onErrorCaptured((error) => {
  // Do what you want with the error
})
</script>

<template>
	<ChildComponent />
</template>
If any error is thrown in the child component or its decedents
It will be caught by the onErrorCaptured hook
<script setup>
onErrorCaptured((error) => {
  // Do what you want with the error
})
</script>

<template>
	<ChildComponent />
</template>
If any error is thrown in the child component or its decedents
<script setup>
onErrorCaptured((error) => {
  // Do what you want with the error
  return false;
})
</script>

<template>
	<ChildComponent />
</template>
To stop the error from propagating any further, we must return false
<script setup>
const nuxtApp = useNuxtApp()

nuxtApp.hook("vue:error", (error) => {
  console.log("We got an error: ", error);
});
</script>

<template>
	<ChildComponent />
</template>
Nuxt also provides the vue:error hook which is triggered when an error propagate all the way up to the root component
<script setup>
const nuxtApp = useNuxtApp()

nuxtApp.hook("vue:error", (error) => {
  console.log("We got an error: ", error);
});
</script>

<template>
	<ChildComponent />
</template>
Nuxt also provides the vue:error hook which achieves the same thing
The useNuxtapp() composable allow us to get the running Nuxt instance
The errors don't stop at the root component
They go all the way up to the global errorHandler in Vue config
<script setup>
const nuxtApp = useNuxtApp()

nuxtApp.vueApp.config.errorHandler = (error) => {
  // handle error, e.g. report to a service
}
</script>

<template>
	<ChildComponent />
</template>
The Error Boundary Component
Isolate client side errors to only a portion of the page
<NuxtErrorBoundary>
  <template #error="{ error, clearError }">
    <div>
      <h1>Error</h1>
      <p>{{ error.message }}</p>
      <UButton @click="clearError">Clear Error</UButton>
    </div>
  </template>
  <MyWidget />
</NuxtErrorBoundary>
see branch: example/error-boundary
Questions?
🙋🏾♀️
Exercise 5
👩💻👨🏽💻
SEO and Meta
6
Section
Nuxt offers several SEO features
to help boost your page rankings
Defaults
export default defineNuxtConfig({
  app: {
    head: {
      charset: 'utf-8',
      viewport: 'width=device-width, initial-scale=1',
    }
  }
})
By adding the app.head property in your nuxt.config.ts,
you can customize the head section for your entire app

export default defineNuxtConfig({
  app: {
    head: {
      charset: 'utf-8',
      viewport: 'width=device-width, initial-scale=1',
    }
  }
})
By adding the app.head property in your nuxt.config.ts,
you can customize the head section for your entire app
We can't pass reactive data to the app.head property.
If you need dynamic data, use the useHead() composable instead
💡
useHead()
<script setup>
const theme = ref("dark");

useHead({
  title: "Nuxt Cert Bootcamp",
  meta: [{ name: "description", content: "Boost your Nuxt skills.." }],
  htmlAttrs: {
    class: theme,
  },
  script: [{ innerHTML: "console.log('Hello world')" }],
});
</script>
With the useHead() composable, we can add dynamic data to our tags
from within any component
<script setup>
const theme = ref("dark");

useHead({
  title: "Nuxt Cert Bootcamp",
  meta: [{ name: "description", content: "Boost your Nuxt skills.." }],
  htmlAttrs: {
    class: theme,
  },
  script: [{ innerHTML: "console.log('Hello world')" }],
});
</script>
Just like all composables,
It has to be used directly inside the script setup
<script setup>
useHead({
  script: [
    {
      src: 'https://third-party-script.com',
      // valid options are: 'head' | 'bodyClose' | 'bodyOpen'
      tagPosition: 'bodyClose'
    }
  ]
})
</script>
We can also set the tag's position by using the tagPosition property within the script object
useSeoMeta()
The useSeoMeta() composable allows you to define your page's
meta tags as a simple object, with full TypeScript support
<script setup>
useSeoMeta({
  title: 'Nuxt Workshop',
  ogTitle: 'Nuxt Workshop',
  description: 'Boost your Nuxt skills..',
  ogDescription: 'Boost your Nuxt skills..',
  ogImage: 'https://example.com/image.png',
  twitterCard: 'summary_large_image',
})
</script>
useSeoMeta() composable helps you avoid typos and common mistakes, such as using name instead of property in some cases
<script setup>
useSeoMeta({
  ogTitle: 'Nuxt Workshop',
})
</script>
<script setup>
useHead({
meta: [
{ name: 'og:title', content: 'Nuxt Workshop' }
]
})
</script><meta property=”og:title” content=”Nuxt Cert Bootcamp” /><meta name=”og:title” content=”Nuxt Cert Bootcamp” />useSeoMeta() composable helps you avoid typos and common mistakes, such as using name instead of property in some cases
<script setup>
useSeoMeta({
  ogTitle: 'Nuxt Cert Bootcamp',
})
</script>
<script setup>
useHead({
meta: [
{ name: 'og:title', content: 'Nuxt Cert Bootcamp' }
]
})
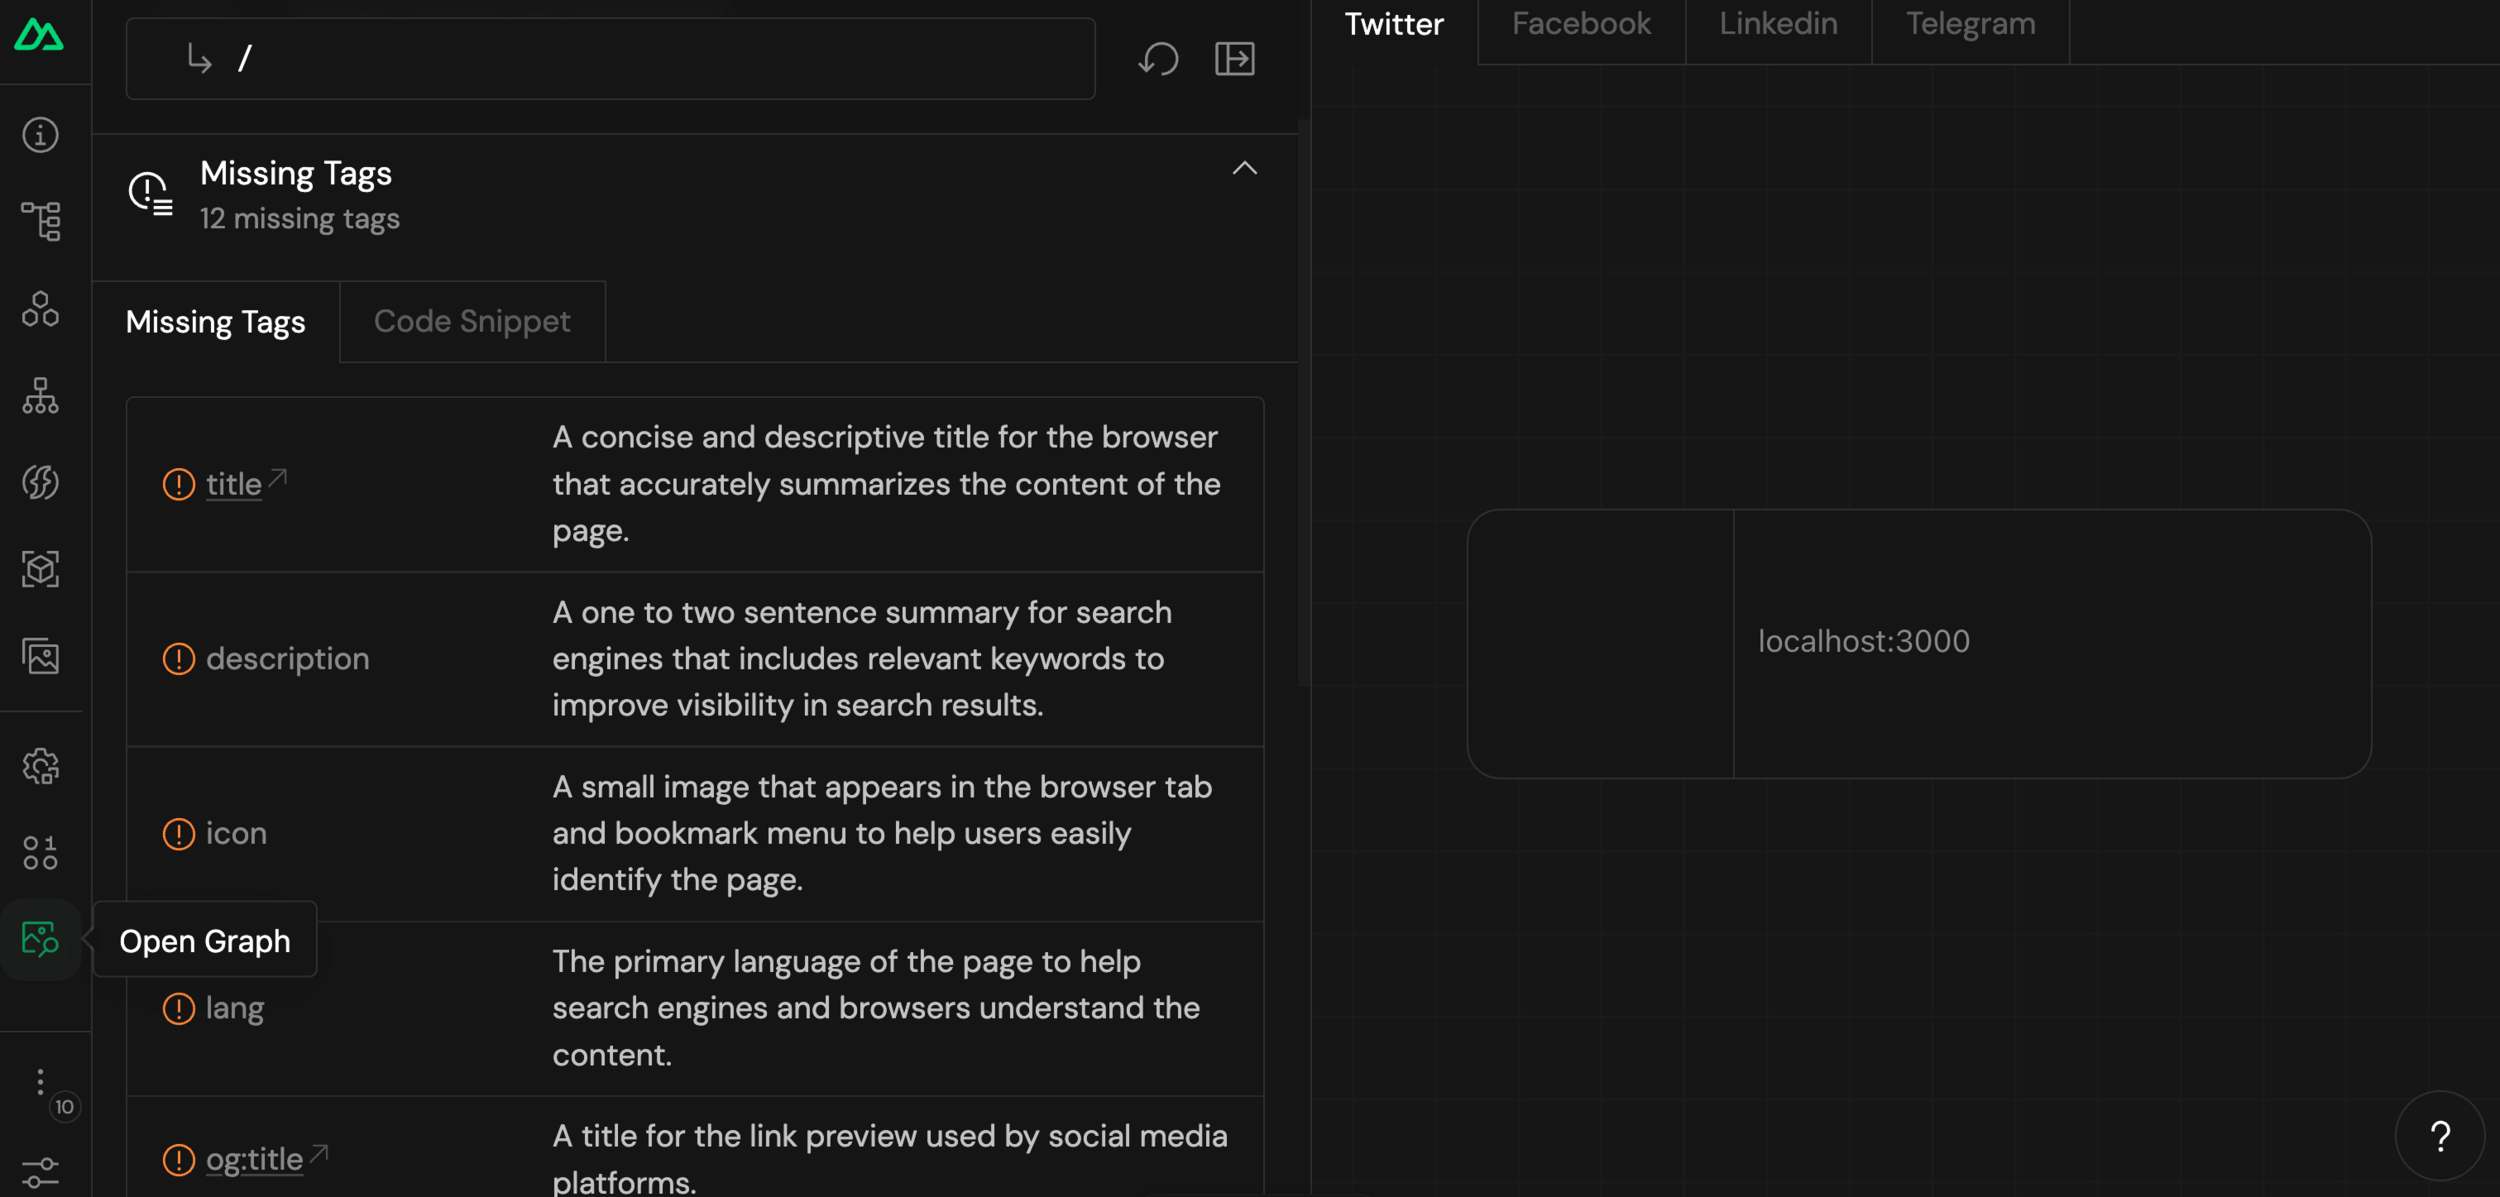
</script><meta property=”og:title” content=”Nuxt Cert Bootcamp” /><meta name=”og:title” content=”Nuxt Cert Bootcamp” />Check the 'Open Graph' tab in Nuxt DevTools to spot any missing important tags
💡

useSeoMeta() composable helps you avoid typos and common mistakes, such as using name instead of property in some cases
<script setup>
useSeoMeta({
  ogTitle: 'Nuxt Cert Bootcamp',
})
</script>
<script setup>
useHead({
meta: [
{ name: 'og:title', content: 'Nuxt Cert Bootcamp' }
]
})
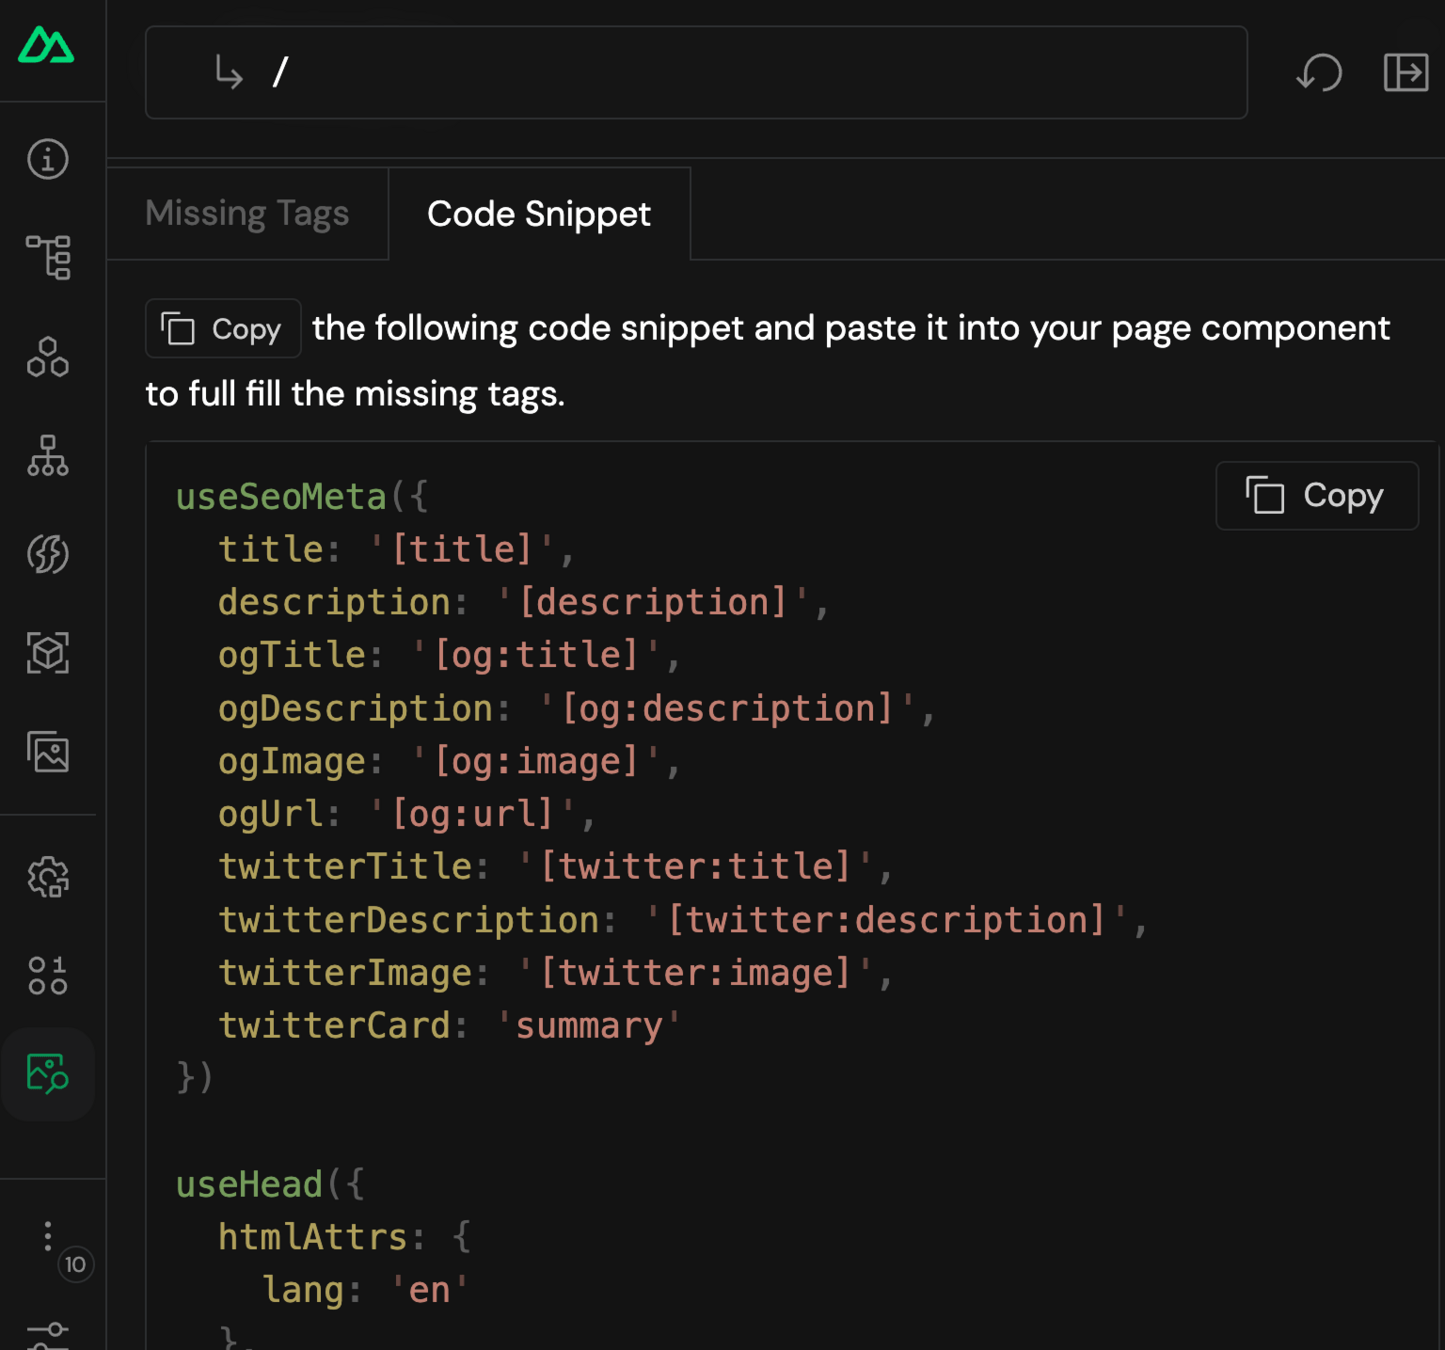
</script><meta property=”og:title” content=”Nuxt Cert Bootcamp” /><meta name=”og:title” content=”Nuxt Cert Bootcamp” />It even provides ready-to-paste code snippet to fix all your missing tags!
💡
Set reactive values as SEO Meta
<script setup>
const title = ref("Nuxt Workshop");
useSeoMeta({
  title: 'Nuxt Workshop',
  //...
})
</script>
Or properties of reactive objects via a getter function
<script setup>
const product = ref({
   title: "Super cool product thing"
});
useSeoMeta({
  title: ()=> product.value.title
  //...
})
</script>
Components
Nuxt offers <Title>, <Base>, <NoScript>, <Style>, <Meta>, <Link>, <Body>, <Html>, and <Head> components to directly manage metadata within your component's template.
<script setup lang="ts">
const title = ref('Hello World')
</script>

<template>
  <div>
    <Head>
      <Title>{{ title }}</Title>
      <Meta name="description" :content="title" />
      <Style type="text/css" children="body { background-color: green; }" ></Style>
    </Head>

	<!-- page content -->
  </div>
</template>
Questions?
🙋🏾♀️
Exercise 6
👩💻👨🏽💻
Configuring Nuxt Projects
7
Section
nuxt.config
1.
So far, we used the nuxt.config file to:
- Change rendering modes
- Use routeRules for hybrid rendering
- Customize the document's head section
The nuxt.config file is the key to configuring our Nuxt app

It exists in the root directory for any Nuxt project
You can rename it to nuxt.config.js to use it without TypeScript support
.js
But, it's recommended to use TypeScript for this file to get help from your IDE
👑
export default defineNuxtConfig({
  ssr: false,
  // Other configuration options..
})
The file exports the defineNuxtConfig function,
which takes an object with configuration options
There are SOOO MANY configuration options

you don't have to know them all by heart

Nuxt offers a runtime config API to manage configuration
and secrets in your application
export default defineNuxtConfig({
  runtimeConfig: {
    superSecretKey: '1ae3gffdr3',
    public: {
      apiBase: '/api'
    }
  }
})
We use the runtimeConfig property to define and expose both
secret and public data
export default defineNuxtConfig({
  runtimeConfig: {
    superSecretKey: '1ae3gffdr3',
    public: {
      apiBase: '/api'
    }
  }
})
Top level properties
Only available on the server
Used for secret keys
export default defineNuxtConfig({
  runtimeConfig: {
    superSecretKey: '1ae3gffdr3',
    public: {
      apiBase: '/api'
    }
  }
})
Top level properties
Only available on the server
Used for secret keys
Nested in public
Exposed to both client and server
Used for public data
<script setup>
const runtimeConfig = useRuntimeConfig()

console.log('Secret key: ', runtimeConfig.superSecretKey)
console.log('Public key: ', runtimeConfig.public.apiBase)
</script>
We can access runtimeConfig anywhere in our Nuxt app using the useRuntimeConfig() built-in composable
export default defineNuxtConfig({
  runtimeConfig: {
    superSecretKey: '1ae3gffdr3',
    public: {
      apiBase: '/api'
    }
  }
})
<template>
<p>API Base URL: {{ $config.public.apiBase }}</p>
</template>Alternatively, we can use $config to access the public runtimeConfig properties directly in the template
export default defineNuxtConfig({
  runtimeConfig: {
    public: {
      apiBase: '/api'
    }
  }
})
What do you think will be logged to the console in a
universal rendered app? 🤔
<script setup>
const runtimeConfig = useRuntimeConfig()

console.log('Secret key: ', runtimeConfig.superSecretKey)
console.log('Public key: ', runtimeConfig.public.publicKey)
</script>
export default defineNuxtConfig({
runtimeConfig: {
superSecretKey: 'secured-key',
public: {
publicKey: 'exposed-key'
}
}
})<script setup>
const runtimeConfig = useRuntimeConfig()
console.log('Secret key: ', runtimeConfig.superSecretKey)
console.log('Public key: ', runtimeConfig.public.publicKey)
</script>export default defineNuxtConfig({
runtimeConfig: {
superSecretKey: 'secured-key',
public: {
publicKey: 'exposed-key'
}
}
})SSR
Secret key: 'secured-key'
Public key: 'exposed-key'
CSR
Secret key: undefined
Public key: 'exposed-key'
export default defineNuxtConfig({
  runtimeConfig: {
    superSecretKey: 'secured-key',
    public: {
      publicKey: 'exposed-key'
    }
  }
})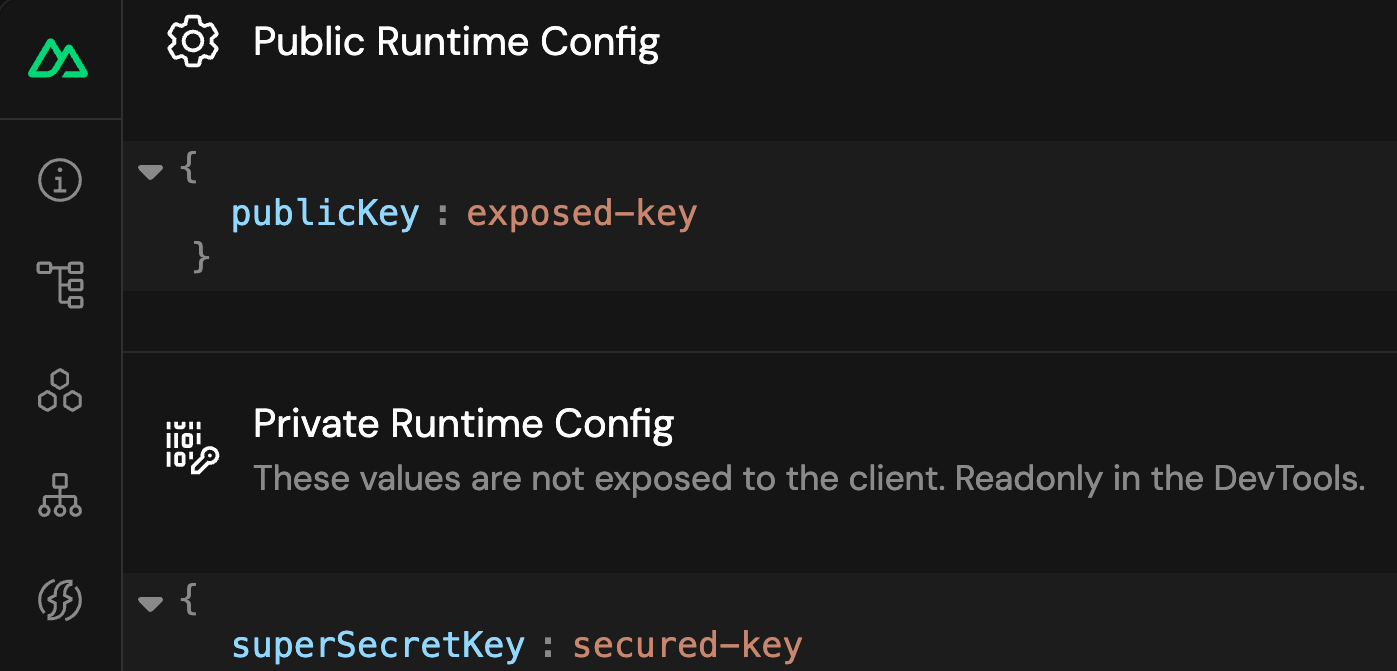
We can check the runtime configs using the 'Runtime Configs' tab
in Nuxt DevTools
// nuxt.config.js
export default defineNuxtConfig({
  runtimeConfig: {
    superSecretKey: "default value"
    public: {
      publicKey: "default value"
    }
  }
})
We can assign values using environment variables from the .env file
// .env
NUXT_SUPER_SECRET_KEY=secured_key
NUXT_PUBLIC_PUBLIC_KEY=exposed_key
(based on variable names and NUXT_ prefix)
// nuxt.config.js
export default defineNuxtConfig({
  runtimeConfig: {
    superSecretKey: process.env.SUPER_SECRET_KEY,
    public: {
      publicKey: process.env.PUBLIC_KEY
    }
  }
})
// .env
SUPER_SECRET_KEY=secured_key
PUBLIC_KEY=exposed_keyDon't do this!
It will only work during build-time and will break at runtime
❌
❌
Every time we run the production server,
It is our responsibility to provide the environment variables to the server in order to override the runtimeConfig values
// nuxt.config.js
export default defineNuxtConfig({
runtimeConfig: {
public: {
publicKey: "updated-key"
}
}
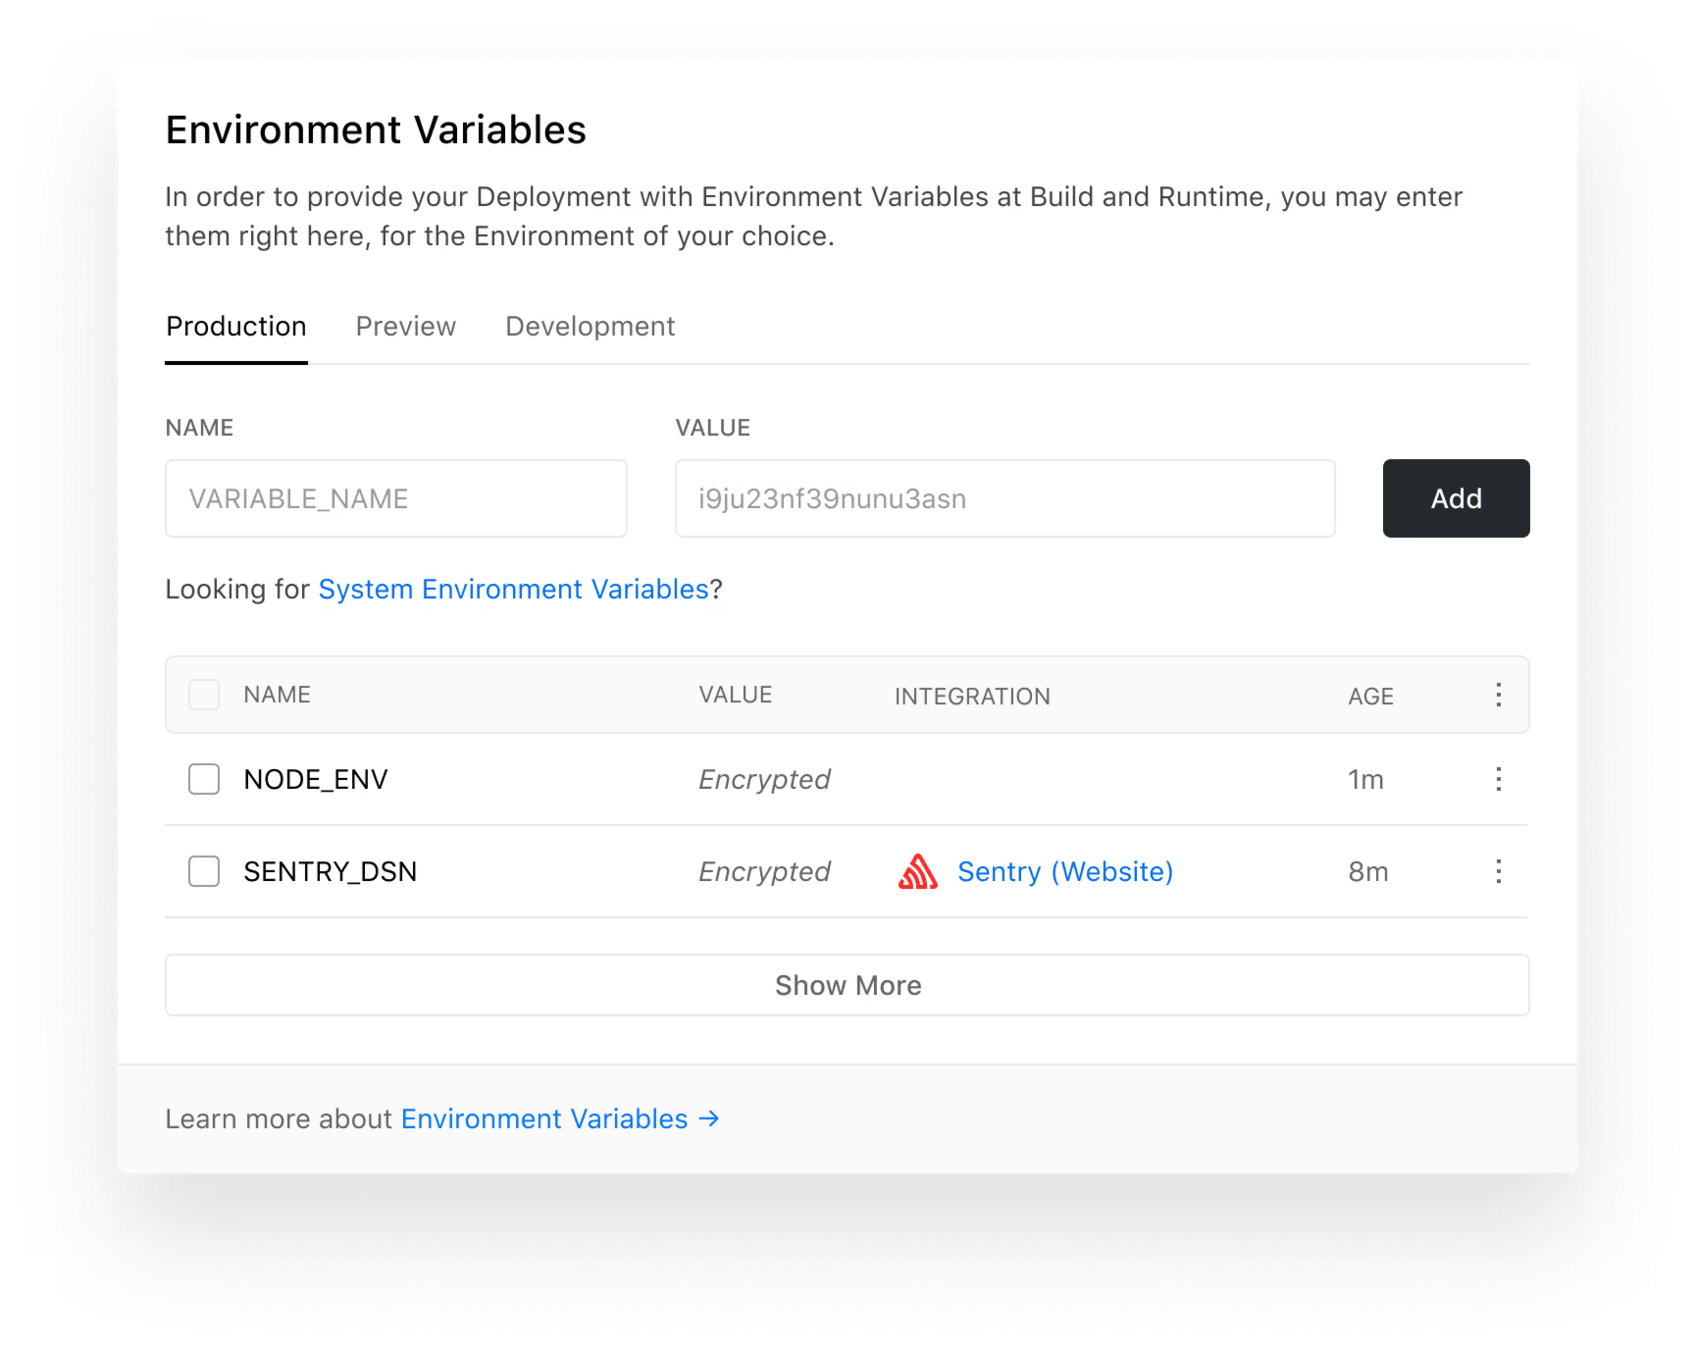
})NUXT_PUBLIC_PUBLIC_KEY=updated-key node .output/server/index.mjsMake sure to set environment variables explicitly using the tools and methods provided by your hosting platform
Vercel UI for updating environment variables
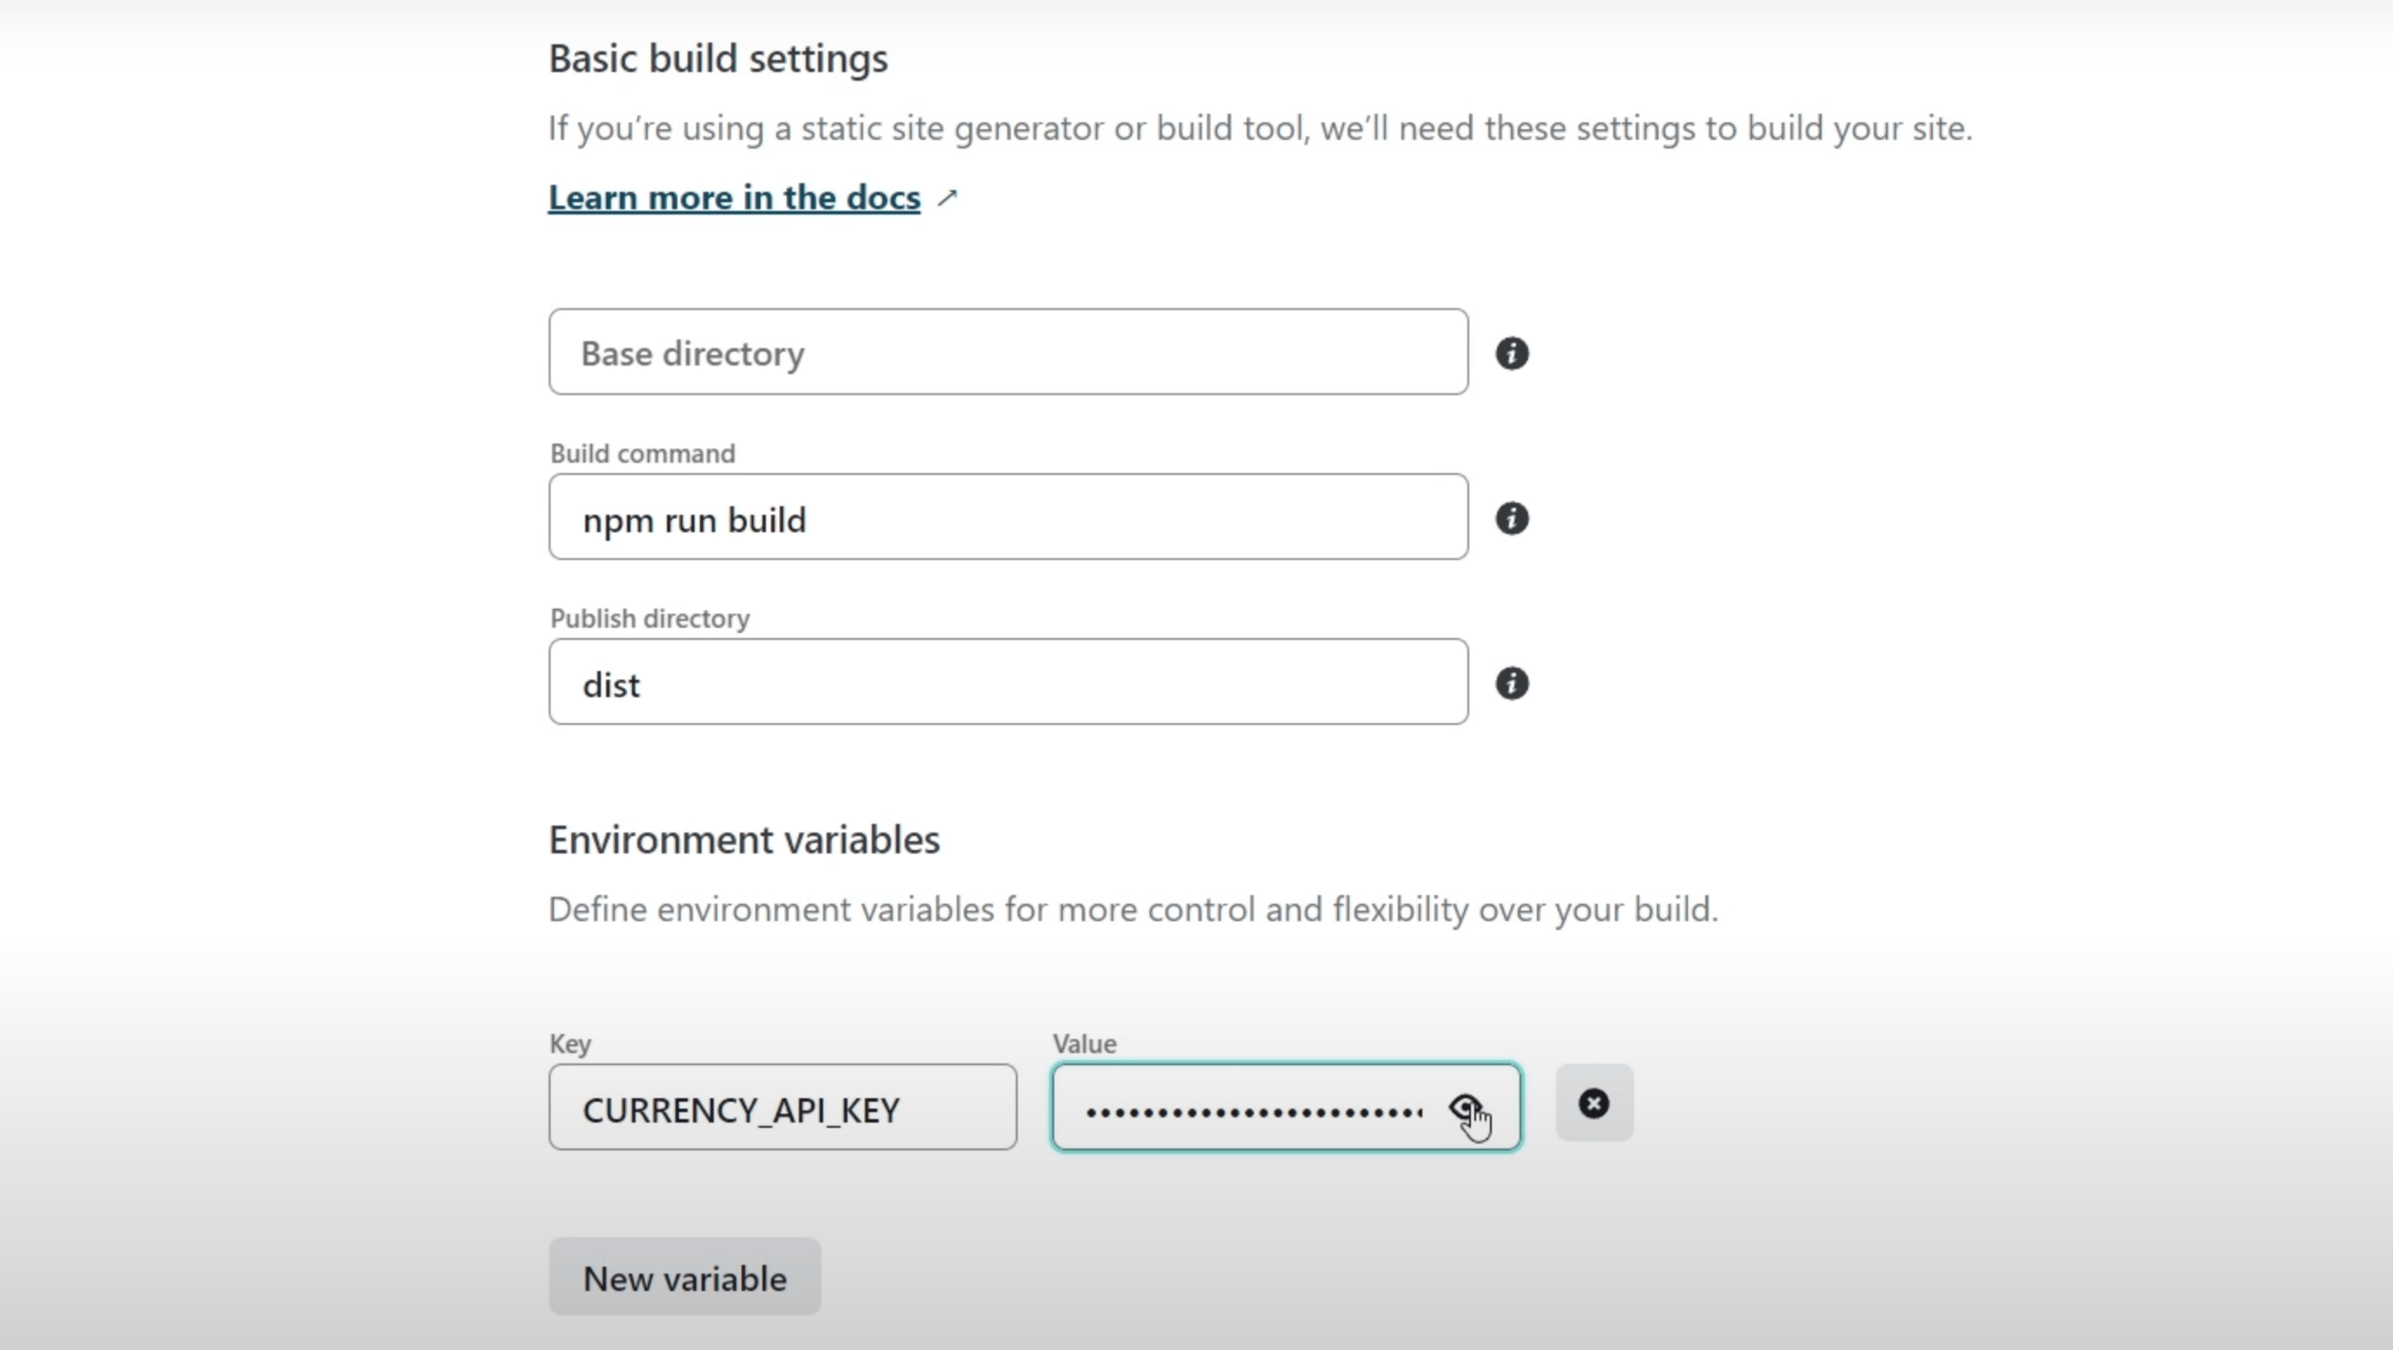
Netlify UI for Nuxt deployment
Never render private variables or use them on the client side in any way
// nuxt.config.js
export default defineNuxtConfig({
  runtimeConfig: {
    superSecretKey: import.meta.env.SUPER_SECRET_KEY,
  }
})
// .env
SUPER_SECRET_KEY=secured_key<!-- app.vue -->
<template>
<div> {{ $config.superSecretKey }} </div>
</template>Another cool thing about the nuxt.config file
export default defineNuxtConfig({
  $production: {
	runtimeConfig: {
      apiKey: 'production-api-key'
    }
  },
  $development: {
    runtimeConfig: {
      apiKey: 'testing-api-key'
    }
  }
})
It's environment-aware!
app.config
2.
The app.config file provides another way to define and expose configuration options to the app
export default defineAppConfig({
  siteName: 'Nuxt Bootcamp'
  // Other options..
})
The file exports the defineAppConfig function,
which takes an object with configuration options
export default defineAppConfig({
  siteName: 'Nuxt Bootcamp'
  // Other options..
})
Use the useAppConfig built-in composable to access the define configs
<script setup>
const appConfig = useAppConfig()
</script>

<template>
 <h1> {{ appConfig.siteName }} </h1>
</template>
export default defineAppConfig({
siteName: 'Nuxt Bootcamp'
})All defined configs are completely reactive and
can be changed at runtime
<script setup>
const appConfig = useAppConfig()
appConfig.siteName = "The Awesome Nuxt Bootcamp"
</script>
<template>
<h1> {{ appConfig.siteName }} </h1>
</template>
export default defineAppConfig({
  siteName: 'Nuxt Bootcamp'
})Use the updateAppConfig function to merge new properties to the app config at runtime
<script setup>
const appConfig = useAppConfig()
appConfig.siteName = "The Awesome Nuxt Bootcamp"
updateAppConfig({siteDescription: 'Nuxt Bootcamp Codebase'})
</script>
<template>
<h1> {{ appConfig.siteName }} </h1>
<p v-if="appConfig.siteDescription">
{{ appConfig.siteDescription }}
</p>
</template>
export default defineAppConfig({
  siteName: 'Nuxt Bootcamp'
})
Use the updateAppConfig function to merge new properties to the app config at runtime
<script setup>
const appConfig = useAppConfig()

appConfig.siteName = "The Awesome Nuxt Bootcamp"
updateAppConfig({siteDescription: 'Nuxt Bootcamp Codebase'})
</script>

<template>
 <h1> {{ appConfig.siteName }} </h1>
 <p v-if="appConfig.siteDescription">
  {{ appConfig.siteDescription }}
 </p>
</template>Don't add any sensitive data to the app.config file.
All the data defined will be exposed to the client.
💡

So...
We have to ways to expose configuration options to the app
// nuxt.config.ts
export default defineNuxtConfig({
  runtimeConfig: {
    secretKey: '123',
    public: {
      publicKey: '/api'
    }
  }
})
// app.config.ts
export default defineAppConfig({
foo: 'bar'
})When Should We Use What?
// nuxt.config.ts
export default defineNuxtConfig({
  runtimeConfig: {
    secretKey: '123',
    public: {
      publicKey: '/api'
    }
  }
})
// app.config.ts
export default defineAppConfig({
foo: 'bar'
})- Specified after the app is built
- Expose environment variables and private tokens
- Override configurations at runtime with environment variables
- Partial TypeScript Support
- Specified during build time
- Expose public, non-sensitive project configurations
- Defined configs cannot be changed based on environment variables
- Full TypeScript support
nuxt.config runtimeConfig
app.config
Questions?
🙋🏾♀️
No Exercise for this section

Asset handling
8
Section
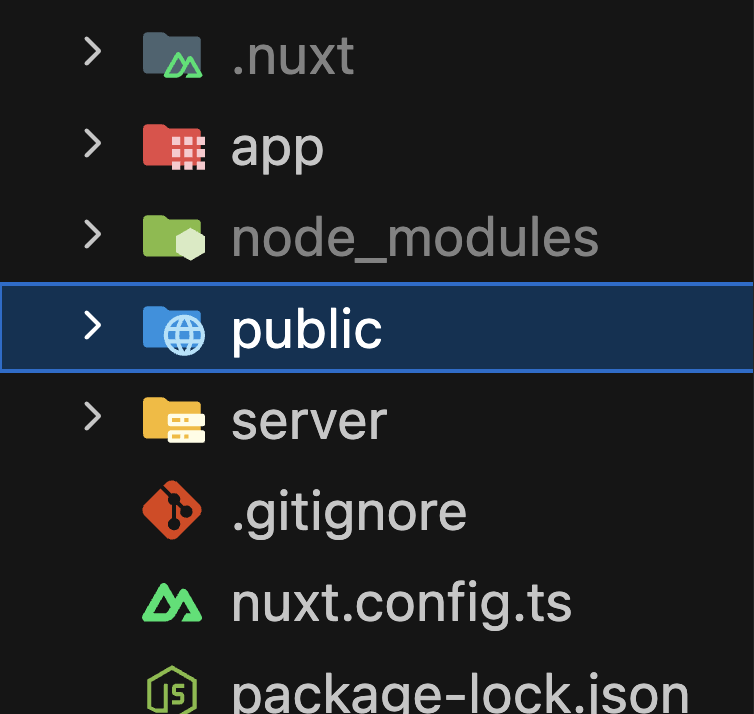
Nuxt provide two primary directories to manage assets
public/
1.
assets/
2.
Nuxt provide two primary directories to manage assets
public/
1.
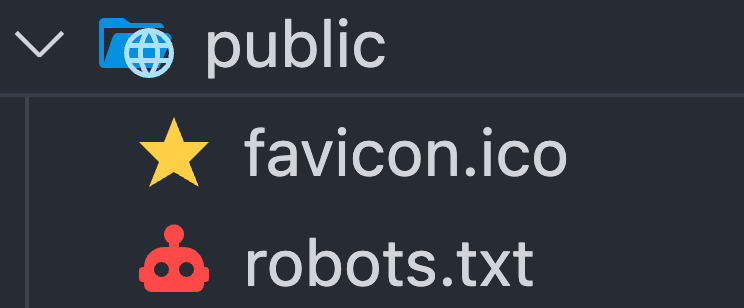
The public/ directory stores all static assets

The public/ directory serves static assets
at your app's root URL
<template>
  <img src="/img/logo.png" alt="pizza.com logo" />
</template>
pizza.com/img/logo.png
Files in the public/ directory are not modified by the build process
Making it ideal for files that rarely change and
must keep their original names
The public/ directory can also be used to store local fonts

This allows us to register the font in our CSS and link it using url()
@font-face {
  font-family: 'MySpecialFont';
  src: url('/fonts/MySpecialFont.woff') format('woff');
  // ...
}
<style>
h1 {
font-family: 'FarAwayGalaxy', sans-serif;
}
</style>Public directory is also great with the Nuxt Image Module
assets/
2.

The assets/ directory typically holds stylesheets, fonts, and images that aren’t served from the public/ directory
Files inside the assets/ directory are processed by Vite during the build process for performance or caching purposes
We can use the assets stored in the assets/ directory
by prefixing its path with ~/assets/
<template>
  <img src="~/assets/img/logo.png" alt="pizza.com logo" />
</template>
Nuxt won't serve files in the assets/ directory at a static URL
<template>
  <img src="~/assets/img/logo.png" alt="pizza.com logo" />
</template>
???
Stylesheets can be imported locally in components
<script setup>
// Use a static import for server-side compatibility
import '~/assets/css/base.css'

// Caution: Dynamic imports are not server-side compatible
import('~/assets/css/base.css')
</script>

<style>
@import url("~/assets/css/override.css");
</style>
Use the scoped attribute on the style tag to ensure style apply only to this component's elements
<style scoped>
@import url("~/assets/css/override.css");
</style>
For global styles, use the css property in nuxt.config
export default defineNuxtConfig({
  css: ['~/assets/css/main.css']
})
For global styles, use the css property in nuxt.config
export default defineNuxtConfig({
  css: ['~/assets/css/main.css']
})
Styles added to the css property will be included in all pages
As for external stylesheets
export default defineNuxtConfig({
  app: {
    head: {
      link: [{ rel: 'stylesheet', href: 'https://cdnjs.cloudflare.com/....min.css' }]
    }
  }
})
OR
<script setup>
useHead({
  link: [{ rel: 'stylesheet', href: 'https://cdnjs.cloudflare.com/....min.css' }]
})
</script>
Questions?
🙋🏾♀️
No Exercise for this section
Deployment
8
Section
Nuxt apps deployment types
A Nuxt application can be deployed
Node.js server
pre-rendered for static hosting
Serverless or edge (CDN) environments
npm run buildRun the build command to build your app's production bundle
node .output/server/index.mjsUse the .output/server/index.mjs
to start the production server you built with node
bun run .output/server/index.mjsOther JavaScript runtimes are supported too
When and where to run those commands?
It depends on how and where do you host the app
Each hosting platform has its own deployment guide for applications
Netlify UI for Nuxt deployment
There are plenty of hosting providers for Nuxt
npx serve .output/publicTo deploy static Nuxt apps,
Just generate the pages and deploy the .output/public directory to any static hosting provider
npm run generateQuestions?
🙋🏾♀️
No Exercise for this section
🎉
That's all for this workshop

🙋🏾♀️
Any final questions?